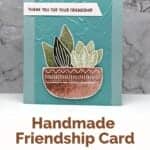
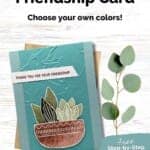
It’s so easy to create this personalized Thank You card using the Planted Paradise Stamp Set. This set allows you to create thank you cards that are not just heartfelt but also have a refreshing natural look. Whether it’s to thank someone for a kind gesture or a special gift, these plant-inspired cards will surely leave a lasting impression.

The Planted Paradise Stamp Set is a Reversibles Stamp Set, which means that it includes specialized photopolymer stamps that allow you to stamp with both sides of the stamp for greater versatility. While I didn’t use that option on this card, you can see that technique here.

I wanted a more “southwestern” flavor for this card, but you could easily change up the colors to something bolder or softer. Make sure you check out my Color Combination Library for other color combinations you might prefer – you’re sure to find something you like there!
How To Make This Card
Project Skill Level: Worker Bee
Worker Bee projects are designed for the crafter who has a bit more time and enjoys creating a handmade card that features a technique or tool. In many cases, a Stampin’ Cut & Emboss Machine is required for die-cutting and/or embossing.
Cardstock Measurements:
- Pool Party Cardstock: 5-1/2″ x 8-1/2″, scored at 4-1/4″
- Basic White: 4″ x 5-1/4″
- Coastal Cabana Cardstock: 3-1/4″ x 5-1/2″
- Basic White Cardstock: 1/2″ x 3-1/2″
- Basic White Cardstock: 5-1/2″ x 8-1/2″ (scrap for fussy cutting)


Grab your Free copy
Get 5 Bee-utiful Exclusive
Card Sketches in Your Inbox
Join our newsletter and receive a honey of a package of five quick & simple cards guaranteed to make your creativity buzz! Sign up now and let the goodness flow straight to your inbox!
Step-by-Step Instructions:
- Fold the Pool Party cardstock in half at the score line and burnish well with your bone folder.
- Adhere the 4″ x 5-1/4″ piece of Basic White cardstock inside the card.
- Run the Coastal Cabana cardstock through the Stampin’ Cut and Emboss Machine using the Painted Textures 3D Embossing Folder. Adhere to the front of the card.
- Using the 5-1/2″ x 8-1/2″ piece of Basic White Cardstock, ink the bowl from the Planted Paradise Stamp Set using Copper Clay ink, tap off once on your scratch sheet, and then stamp onto the White cardstock.
- Stamp 6 of the small leaves (3 detailed, 3 bold) onto the cardstock using Soft Sea Foam ink.
- Stamp the larger detailed leaf onto the cardstock one time using Mossy Meadow ink. Clean stamp, flip over to the other “bold” side, ink using Mossy Meadow ink, tap off once on your scratch paper, and then stamp onto the cardstock. Repeat one more time.
- Fussy Cut out the bowl and the 9 leaves using your Paper Snip Scissors.
- Adhere the 2 large bold leaves and the 3 small bold leaves to the cardstock. Adhere the large detailed leaf and the 3 small detailed leaves over the other leaves using Stampin’ Dimensionals.
- Adhere the bowl over the bottom of the leaves using Stampin’ Dimensionals.
- Ink up the sentiment from the Perennial Postage stamp set using Coppy Clay ink and stamp onto the 1/2″ strip of Basic White cardstock. Use your Paper Snips to angle the end as shown in the sample and adhere to the front of the card lining up on the left fold line to finish.
A Tip from Barb
This is not a difficult card, but it does require a lot of fussy cutting, which requires time. If you want to make multiples of this card, I recommend that you do it “assembly style” meaning you stamp all of the leaves, then fussy cut them all out, then build your card. The Painted Texures Embossing Folder does add some depth and interest to your card, but if you don’t have that Folder, just leave it off! The card will still look fabulous! ?
Thank you so much for stopping by! I hope you feel inspired to create and that you also feel you have all the info you need to make this card with these instructions. If you aren’t sure about something or would like more detailed directions on how to make this card, feel free to email me. I’m here to help!

Don’t forget to pin this for later!