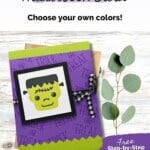
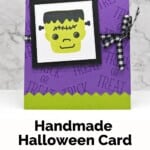
Are you ready to sprinkle a little bit of Halloween Magic with Tricks and Treats Stamp Set by Stampin’ Up? This adorable stamp set by Stampin’ Up! is here to transform your crafting world with a touch of magic and a sprinkle of spooky fun.
An added benefit to this card for this card is that the Tricks and Treats stamps are Two-Step Stamping stamps, which are my favorite type of stamps! Basically what this means are that the stamp are made as a two-step stamping process that allows you to layer images using different stamps from the set. It’s like building an image piece by piece. So in this case, you can stamp the monsters face in one color (Lemon LIme Twist) and then the other details in Black ink. I literally can build this face in seconds – how cool is that?
Get ready to build your haunted house scene or combine the vampire and Frankenstein faces for a card that tells a story. The power to create is right at your fingertips, Let’s get started!
How To Make This Card
Project Skill Level: Busy Bee
Busy Bee projects are designed for the beginner or busy papercrafter. This is a basic cardmaking project that can be achieved by someone who has never made a handmade card before. You can view more Busy Bee cards here.
Cardstock Measurements:
- Granny Apple Green Cardstock: 4-1/4″ x 11″, scored at 5-1/2″
- Basic White Cardstock: 4″ x 5-1/4″
- Gorgeous Grape Cardstock: 4-1/4″ x 4-1/2″
- Basic Black Cardstock: 3″ x 3″
- Basic White Cardstock: 2-1/2″ x 2-1/2″


Grab your Free copy
Get 5 Bee-utiful Exclusive
Card Sketches in Your Inbox
Join our newsletter and receive a honey of a package of five quick & simple cards guaranteed to make your creativity buzz! Sign up now and let the goodness flow straight to your inbox!
Step-by-Step Instructions:
- Fold the Granny Apple Green cardstock in half at the scoreline and burnish well with the Bone Folder.
- Adhere the 4″x 5-1/4″ piece of Basic White Cardstock inside the card.
- Using the Gorgeous Grape ink pad, stamp the sentiment randomly over the Gorgeous Grape cardstock. OPTIONAL: run the cardstock through the Cut & Emboss Machine and cut off the bottom using the jagged border die from the Tricks & Treats Dies.)
- Wrap Ribbon around the center of the Gorgeous Grape cardstock and tie into a bow on the right side, trimming edges as needed. Adhere the cardstock to the card front.
- Optional: run the Basic Black and Basic White squares through the Cut & Emboss Machine using the 2-3/4″ x 2-1/4″ square dies from the Stylish Shapes Dies. If you do not have these dies, see my note below.
- Using the 2-1/4″ Basic White square, stamp the “bold” monster face using Lemon Lime Twist ink. Using the detailed monster face, ink up with Black Memento ink and stamp over the green face, lining up the top of his hair and the side “pegs”.
- Adhere the Basic White cardstock to the Basic Black cardstock and adhere to left side of card, lining up over the ribbon, using Stampin’ Dimensionals to finish.
A Tip from Barb
Although this card technically uses the Stampin’ Cut & Emboss Machine along with the two sets of dies, I decided to keep this as a Busy Bee card because truly, it’s SO simple.
If you don’t have a die-cut machine, just use the cardstock sizes I share above but cut them down by 1/4″ (e.g., cut the Basic Black to a 2-3/4″ square and the White to a 2-1/4″ square.)
And simply leave the bottom of the Gorgeous Grape paper flat (it’ll still look adorable!) or if you have some decorative scissors lying around the house, you can use those! Either way, the actual stamping on this card only takes seconds and it is soooo adorable, I couldn’t resist categorizing it as a Busy Bee card!?
Thanks for stopping by for today’s card tutorial! My goal is to help you make quick & easy greeting cards for all occasions. If you’d like more detailed directions on how to make this card, feel free to email me. I hope you’ll join me again for more card-making ideas!

Don’t forget to pin this for later!