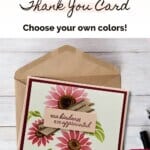
Want to create a DIY Thank You Card with a personal touch? Then give the Abundant Beauty Decorative Masks by Stampin’ Up! a try! These amazing masks offer a plethora of opportunities to craft the most heartfelt thank you cards for all seasons. I even have a video for you to watch — I’ll show you how easy it is to use these Decorative Masks!

While I went with a soft burgundy palette for this card, any color combination will work. Make sure you check out my Color Combination Library for more ideas! Pick your colors, pick your season, and let’s create! There is an undeniable charm in handmade thank you cards, a kind of warmth that mass-produced cards just can’t replicate. Let’s spread gratitude in the most artistic and personal way, shall we?
How To Make This Card
Project Skill Level: Busy Bee
Busy Bee projects are designed for the beginner or busy papercrafter. This is a basic cardmaking project that can be achieved by someone who has never made a handmade card before. You can view more Busy Bee cards here.
Cardstock Measurements:
- Petal Pink Cardstock: 5-1/2” x 8-1/2”, scored at 4-1/4”
- Cherry Cobbler Cardstock: 4” x 5-1/4”
- Very Vanilla Cardstock: 3-3/4” x 5” (2 pieces)
- Petal Pink Cardstock: 1” x 2-3/4”


Grab your Free copy
Get 5 Bee-utiful Exclusive
Card Sketches in Your Inbox
Join our newsletter and receive a honey of a package of five quick & simple cards guaranteed to make your creativity buzz! Sign up now and let the goodness flow straight to your inbox!
Step-by-Step Instructions:
- Fold Petal Pink Cardstock in half to create your base card.
- Adhere one of the Very Vanilla mats inside the card.
- Using the other Very Vanilla mat, lay the sunflower mask on top of the cardstock and sponge Cherry Cobbler ink over the 3 flowers on the mask.
- Remove the mask and put the leaf mask so that it lines up with the Sunflowers. Use a Blending Brush to sponge Old Olive ink over the leaves. Remove mask.
- Add the “flower center” mask over the flowers so that the images are centered within the sunflowers. Sponge Pecan Pie ink using a Blending Brush. Remove the mask and clean the masks with water.
- Layer the Very Vanilla cardstock onto the card front.
- Cut two 3” pieces of the Pecan Pie ribbon and layer/stagger them in the center of the card using adhesive just in the center.
- Stamp the sentiment onto the Petal Pink cardstock using Cherry Cobbler ink and adhere over the ribbon using Stampin’ Dimensionals to finish.
See the full step-by-step video tutorial
Join our Papercrafting Community for Weekly Live Step It Up Stamping Videos!
A Tip from Barb
Using Stampin’ Up! Decorative Masks is one of those things that’s easier to do than explain. ? The key to the soft subtle look you get from the Decorative Masks are the Blending Brushes. Stampin’ Up! has large and small Blending Brushes, and both will work on this project. I’ve tried this same technique with a “regular” sponge and it just doesn’t give you that same “lightly sponged” look. I hope you’ll give these Decorative Masks a try – they’re amazing!
Thank you so much for stopping by and checking out this papercrafting tutorial. I hope you are inspired to create and send cards. If you’d like more detailed directions on how to make this card, feel free to email me. I love sharing how to make cards here on the BZBStamper blog, and I can’t thank you enough for all of your support!

Don’t forget to pin this for later!