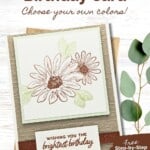
Bring a floral charm to any birthday celebration with this Cheerful Daisies Birthday Card featuring the Cheerful Daisies Stamp Set by Stampin’ Up! A handmade birthday card is a personal and thoughtful gesture that stands out in today’s digital age. It’s a tangible expression of your wishes and a keepsake that the birthday person can treasure.

For this card, I went with a non-traditional daisy color combination of Crumb Cake, Copper Clay and Soft Sea Foam. I then added the Brick Embossed Background to pull those 3 colors together so that it would work for any gender. If you’d prefer a more traditional combination of colors, make sure you check out my Color Combination Library where you’re sure to find a color palette you’ll love.

From a simple, elegant card with a single daisy, to a more elaborate design featuring a bouquet of these cheerful blooms, it’s easy to make a variety of birthday cards in all colors of the rainbow with this versatile Stamp Set!
How To Make This Card
Project Skill Level: Worker Bee
Worker Bee projects are designed for the crafter who has a bit more time and enjoys creating a handmade card that features a technique or tool. In many cases, a Stampin’ Cut & Emboss Machine is required for die-cutting and/or embossing.
Cardstock Measurements:
- Very Vanilla Cardstock: 4-1/4” x 11”, scored at 5-1/2”
- Crumb Cake Cardstock: 4” x 5-1/2”
- Soft Sea Foam Cardstock: 3-1/2” x 3-1/2”
- Very Vanilla Cardstock: 3-1/4” x 3-1/4” and 1” x 2-1/2”


Grab your Free copy
Get 5 Bee-utiful Exclusive
Card Sketches in Your Inbox
Join our newsletter and receive a honey of a package of five quick & simple cards guaranteed to make your creativity buzz! Sign up now and let the goodness flow straight to your inbox!
Step-by-Step Instructions:
- Fold the Very Vanilla Cardstock in half at the score line.
- Run the Crumb Cake cardstock through the Cut & Emboss Machine using the Exposed Brick 3D Embossing Folder.
- Wrap 6” of ribbon around the bottom of the Crumb Cake cardstock and adhere ends of ribbon to back of cardstock. Adhere cardstock to front of the card.
- Using the square of Very Vanilla cardstock, stamp large daisy using Copper Clay ink. Mask the stamped flower by stamping flower on a post-it note, cut out using scissors and layer on top of stamped flower. Stamp the small daisy on top of the mask; remove mask.
- Stamp center to each daisy using Copper Clay ink. Stamp leaves around the daisies using Soft Sea Foam ink. Adhere Vanilla cardstock to Soft Sea Foam cardstock & adhere to card front using Dimensionals.
- Stamp the sentiment onto the 1” strip of Very Vanilla cardstock using Copper Clay ink and adhere over ribbon using Stampin’ Dimensionals.
A Tip from Barb
This card could easily be turned into a quick and easy card simply by removing the Embossing Folder using on the Crumb Cake mat. For a different look, take the Crumb Cake cardstock, crumple it well with your hands, smooth back out and layer onto the card. A different look but just as attractive! Let me know if you give a try and what you think!
Thank you so much for stopping by! I hope you are inspired to make simple handmade cards for friends this week! If you’d like more detailed directions on how to make this card, feel free to email me. Give this papercrafting tutorial a try ? Check back soon for more card making ideas!

Don’t forget to pin this for later!