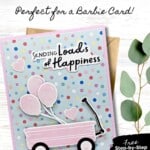
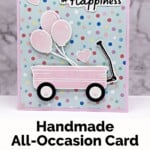
Celebrate someone’s special day with this Filled with Fun Happiness Wagon handmade card. The Filled with Fun Bundle by Stampin’ Up! is perfect for celebrating the big and little moments in life!

I created this card for my “Craft with Barbie” party and I thought the colors and style was perfect! I used a playful & colorful background easily by using the Lighter than Air Designer Paper, and then kept the ink palette simple by using “Barbie Pink” (i.e., Bubble Bath ink) and Basic Black. You’ll find all the card measurements below on how to make this card, so keep reading!
How To Make This Card
Project Skill Level: Worker Bee
Worker Bee projects are designed for the crafter who has a bit more time and enjoys creating a handmade card that features a technique or tool. In many cases, a Stampin’ Cut & Emboss Machine is required for die-cutting and/or embossing.
Cardstock Measurements:
- Bubble Bath Cardstock: 5-1/2” x 8-1/2”, scored at 4-1/4”
- Basic White Cardstock: 4″ x 5-1/4″
- Lighter Than Air Designer Paper: 4” x 5-1/4”
- Basic White Cardstock: 4-1/4″ x 11″ (for die-cutting)
- Basic Black Cardstock: 2” x 2” (for die-cutting)


Grab your Free copy
Get 5 Bee-utiful Exclusive
Card Sketches in Your Inbox
Join our newsletter and receive a honey of a package of five quick & simple cards guaranteed to make your creativity buzz! Sign up now and let the goodness flow straight to your inbox!
Step-by-Step Instructions:
- Fold the Bubble Bath Cardstock in half at the score line to create your card base.
- Adhere the 4” x 5-1/4” Basic White cardstock inside the card.
- Adhere the Lighter Than Air paper onto the front of the card.
- Stamp the sentiment and wagon handle using Black Memento ink onto the 4-1/4” x 11” piece of Basic White cardstock. Stamp the wagon, 3 balloons, and 2 hearts using Bubble Bath ink onto the same cardstock.
- Fussy cut out the sentiment using scissors and adhere to the top right of the card.
- Run the remaining Basic White cardstock through the Stampin’ Cut & Emboss Machine and cut out the images using the Filled With Fun Dies that come in the Bundle. In addition, cut out the 2 small wheel circles and 3 of the Balloon strings.
- Run the Basic Black cardstock through the Cut & Emboss Machine and cut out the 2 large wheel circles. Adhere the 2 Basic White circles from the previous step to these.
- Adhere the handle to the back of the wagon and adhere to the card using Stampin’ Dimensionals. Adhere the wheels to the wagon using Stampin’ Dimensionals.
- Adhere a balloon string to the back of each of the balloons and adhere to the card as shown in the sample. Adhere the 2 hearts as shown in the sample. Add a Bubble Bath Rainbow Dot to the center of each wheel to finish.
Thank you so much for stopping by! I hope you are inspired to make simple handmade cards for friends this week! If you’d like more detailed directions on how to make this card, feel free to email me. Give this papercrafting tutorial a try ? Check back soon for more card making ideas!

Don’t forget to pin this for later!