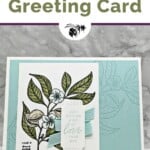
You’ll love this elegant All-Occasion Card using the Lovely and Sweet Bundle by Stampin’ Up! This Bundle is your key to unlocking the beauty of simplicity in card-making by combining the charm of natural plant imagery with versatile sentiments. It’s perfect for crafting cards that suit any occasion, whether it’s a simple thank you, a heartfelt note, or a celebration.

For this card, I went with the soft combination of Pool Party, and Crumb Cake and then added the darker Mossy Meadow for a bolder palette. If you’d prefer a softer or brighter color combination, make sure you check out my Color Combination Library for other color palette ideas.

Let’s dive into today’s Tutorial and discover how to make every card a reflection of elegance and thoughtfulness. . You’ll be amazed at how simple this card is to create.
How To Make This Card
Project Skill Level: Worker Bee
Worker Bee projects are designed for the crafter who has a bit more time and enjoys creating a handmade card that features a technique or tool. In many cases, a Stampin’ Cut & Emboss Machine is required for die-cutting and/or embossing.
Cardstock Measurements:
- Basic White Cardstock: 5-1/2″ x 8-1/2″, scored at 4-1/4″
- Pool Party Cardstock: 4″ x 5-1/4″
- Basic White Cardstock: 3-1/4″ x 3-3/4″
- Basic White Cardstock: 1-1/2″ x 2-1/2″ (for die-cutting)


Grab your Free copy
Get 5 Bee-utiful Exclusive
Card Sketches in Your Inbox
Join our newsletter and receive a honey of a package of five quick & simple cards guaranteed to make your creativity buzz! Sign up now and let the goodness flow straight to your inbox!
Step-by-Step Instructions:
- Fold the Basic White cardstock in half at the score line to create your card base.
- Ink up the large floral stamp using Pool Party ink, stamp off 2 times on your scratch paper, then stamp on the right, then again on the left and bottom without reinking the stamp. Clean the stamp; adhere the Pool Party cardstock to the front of the card.
- Using the same large floral stamp, ink using the Black Memento ink pad and stamp onto the 3-1/4″ x 3-3/4″ Basic White cardstock. Color in using the Pool Party, Crumb Cake and Mossy Meadow Blends.
- Adhere the White cardstock to the left side of the Pool Party cardstock as shown on the sample.
- Stamp the sentiment onto the 1-1/2″ x 2-1/2″ Basic White cardstock using Black Memento ink. Run the cardstock through the Stampin’ Cut & Emboss Machine and cut out using the sentiment tag from the Lovely & Sweet Bundle dies.
- Cut 6″ of the Pool Party ribbon and fold the ribbon every 2″ to create a “Z’; hold together using Glue Dots.
- Adhere the ribbon to the back of the Sentiment Tag using Glue Dots, then adhere the sentiment tag to the card using Stampin’ Dimensionals to finish.
A Tip from Barb
This is actually a very simple card to create, it’s only the Lovely & Sweet Dies that was used on the sentiment tag that stepped it up to a Worker Bee card. If you don’t have these dies, simply cut your White cardstock to 1″ x 2″ and you’ll be good to go!
Thank you so much for stopping by today. I hope you are inspired to create today, whether it is this simple and cute handmade card or another cardmaking project. My goal is to help you carve out some creative joy! If you’d like more detailed directions on how to make this card, feel free to email me. Keep checking back for more projects.

Don’t forget to pin this for later!