In a world of digital messages, a handmade card using the Everyday Details Stamp Set holds immeasurable value. The Everyday Details Stamp Set provides the perfect images and sentiments to express your care and thoughtfulness. With just some stamps, ink, and paper, you can create a beautiful card that will make the recipient feel loved and appreciated.

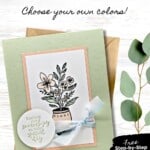
For this card, I wanted soft, sweet colors so I went with a color combination of Petal Pink, Soft Sea Foam and Balmy Blue ribbon. If you’d prefer something brighter or richer, make sure you check out my Color Combination Library, where you’re sure to find something you’ll like.

The Everyday Details Stamp Set by Stampin’ Up! makes it easy to craft a personal token of your thoughts and wishes. This post will inspire you to create a beautiful, heartfelt card that conveys your affection and concern. Whether for a friend or loved one, discover the joy of making and giving a piece of your heart through crafting. Let’s get started and spread some love!
How To Make This Card
Project Skill Level: Busy Bee
Busy Bee projects are designed for the beginner or busy papercrafter. This is a basic cardmaking project that can be achieved by someone who has never made a handmade card before. You can view more Busy Bee cards here.
Cardstock Measurements:
- Soft Sea Foam Cardstock: 5-1/2″ x 8-1/2″, scored at 4-1/4″
- Basic White Cardstock: 4″ x 5-1/4″
- Petal Pink Cardstock: 2-3/4″ x 4-1/4″
- Basic White Cardstock: 2-1/2″ x 4″
- Basic White Cardstock: 2-1/2″ x 2-1/2″ (for punching)


Grab your Free copy
Get 5 Bee-utiful Exclusive
Card Sketches in Your Inbox
Join our newsletter and receive a honey of a package of five quick & simple cards guaranteed to make your creativity buzz! Sign up now and let the goodness flow straight to your inbox!
Step-by-Step Instructions:
- Fold the Soft Sea Foam Cardstock in half at the score line to create your base card.
- Adhere the 4″ x 5-1/4″ piece of Basic White cardstock inside your card.
- Using the 2-1/2″ piece of Basic White Cardstock, stamp the vase image onto the cardstock using Black Memento ink.
- Color in the vase image using the Petal Pink and Soft Sea Foam Blends.
- Adhere the White cardstock to the Petal Pink cardstock. Wrap the Balmy Blue ribbon around the cardstock and tie into a knot (or bow) on the right side as shown in the sample.
- Adhere the Petal Pink cardstock to the front of the card.
- Stamp the sentiment onto the 2-1/2″ square of Basic White Cardstock using the Soft Sea Foam ink pad. Punch out the sentiment using the 1-3/4″ Circle Punch and adhere to the card front using Stampin’ Dimensionals to finish.
A Tip from Barb
This is the perfect card sketch for when you need a quick and easy card. If the rectangular cardstock is too small or large for your focal image, simply adjust the cardstock sizes as necessary. And if you don’t have a circle punch, you can easily replace this circle with a square or another rectangle. This card sketch is very flexible!
Thanks for stopping by for today’s card tutorial! My goal is to help you make quick & easy greeting cards for all occasions. If you’d like more detailed directions on how to make this card, feel free to email me. I hope you’ll join me again for more card-making ideas!

Don’t forget to pin this for later!