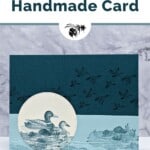
Let your creativity take flight using the stunning Feathered Flight Stamp Set by Stampin’ Up! This handmade card features the tranquil beauty of nature. As a Distinktive Stamp Set, this stamp set also provides a photo-realistic image, adding rich texture and depth in a single step.

Feathered Flight is a Distinktive® stamp set, which is exclusive to Stampin’ Up! Per the Stampin’ Up!® Catalog, “Distinktive stamps create different opacities in a single stamped image for realistic depth and intensity.” Basically what this means is that it has a special texture that gives added depth and dimension in a single step.
An excellent example of this is the duck images on this card. You can see the two-tone colors on this image and that was all done with just one ink pad, with the stamp set doing all of the shading. How awesome is that?
To go with the realistic nature of these stamps, I decided to go with a monochromatic color palette. This keeps the focus on the stamps and captures the serene essence of ducks gliding on water.
The charm of monochromatic cardmaking lies in its elegant restraint, highlighting the power of a single color to convey emotion and atmosphere. This project will not only enhance your crafting repertoire but also introduce you to the nuanced world of Distinktive® stamping, where every detail tells a story. Let’s dive in.
How To Make This Card
Project Skill Level: Worker Bee
Worker Bee projects are designed for the crafter who has a bit more time and enjoys creating a handmade card that features a technique or tool. In many cases, a Stampin’ Cut & Emboss Machine is required for die-cutting and/or embossing.
Cardstock Measurements:
- Pretty Peacock Cardstock: 4-1/4″ x 11″, scored at 5-1/2″
- Very Vanilla Cardstock: 4″ x 5-1/4″
- Pool Party Cardstock: 1-3/4″ x 5-1/2″
- Very Vanilla Cardstock: 2-3/4″ x 2-3/4″ (for die-cutting)


Grab your Free copy
Get 5 Bee-utiful Exclusive
Card Sketches in Your Inbox
Join our newsletter and receive a honey of a package of five quick & simple cards guaranteed to make your creativity buzz! Sign up now and let the goodness flow straight to your inbox!
Step-by-Step Instructions:
- Fold the Pretty Peacock cardstock in half at the 5-1/2″ score line to create you card base.
- Using the trio of birds in flight, stamp on the upper half of the right side of the card using Pretty Peacock ink. Repeat as shown in the sample.
- Stamp the rock/water image several times on the strip of Pool Party cardstock as shown in the sample.
- Adhere the Pool Party cardstock onto the bottom of the card front.
- Open the front of the card and run through the Cut & Emboss Machine using the Stripes Embossing Folder so that only the bottom 3/4″ of the card is embossed.
- Open the card and adhere the 4″ x 5-1/4″ piece of Very Vanilla Cardstock inside the card. Optional: stamp one of the images inside the card using Pretty Peacock ink.
- Using the 2-3/4″ square of Very Vanilla Cardstock, run through the Cut & Emboss Machine and cut out the 2-1/2″ stitched circle from the Stylish Shapes dies.
- Stamp the birds swimming onto the center of the Vanilla Circle die-cut piece using Pretty Peacock ink. Stamp the rock/water image at the bottom of the circle using the same ink so that it slightly overlaps the bird image.
- Adhere the stamped circle to the card front as shown in the sample to finish.
A Tip from Barb
Just a reminder that because this is a Distinctive Stamp Set, there will be lots of variation in color on your stamped image. If you’re not seeing that variation, it’s usually because you have too much ink on your ink pad that’s now allowing those variations to show.
Fortunately, there’s an easy fix for too much ink on your ink pad. Take the back of a plastic spoon and gently rub the spoon over the entire ink pad. This will gently push the ink deeper into the ink pad and provide a better inking. Do not use a credit card or the side of your bone folder to push the ink back into the foam pad – these are sharp and can often tear your ink pad.
Thank you so much for stopping by! I hope you are inspired to make simple handmade cards for friends this week! If you’d like more detailed directions on how to make this card, feel free to email me. Give this papercrafting tutorial a try ? Check back soon for more card-making ideas!

Don’t forget to pin this for later!