You’ll love making this Fun Fold Card using the Everyday Details Stamp Set! Stepping beyond the traditional card fold opens up a world of creativity and surprise for both the maker and the receiver. This is your opportunity to explore the enchanting possibilities of fun fold cards, using the versatile Everyday Details Stamp Set by Stampin’ Up!

Since the focus of this card was on the fun fold, I decided to keep the remaining steps easy. I started with the beautiful Meandering Meadows Designer Paper and pulled the colors straight from the paper: Berry Burst, Tahitian Tide, and Crumb Cake. If you’d prefer something softer, make sure you check out my Color Combination Library.

This stamp set, with its exquisite hand-drawn images and coordinating dies, is the perfect way to craft cards that unfold into cheery sentiments, reveal hidden messages, or stand out in delightful, unexpected ways. Whether you’re celebrating a special occasion or just spreading some happiness, this tutorial will walk you through the basics of creating this fun fold card that is sure to leave a lasting impression.
How To Make This Card
Project Skill Level: Busy Bee
Busy Bee projects are designed for the beginner or busy papercrafter. This is a basic cardmaking project that can be achieved by someone who has never made a handmade card before. You can view more Busy Bee cards here.
Cardstock Measurements:
- Berry Burst Cardstock: 5-1/2″ x 7-1/4″, scored at 3″
- Berry Burst Cardstock: 1-1/2″ x 4″, scored at 1″
- Very Vanilla Cardstock: 4″ x 5-1/4″
- Meandering Meadows Paper: 3-1/2″ x 5-1/4″
- Berry Burst Cardstock: 3″ x 3″
- Very Vanilla Cardstock: 2-3/4″ x 2-3/4″


Grab your Free copy
Get 5 Bee-utiful Exclusive
Card Sketches in Your Inbox
Join our newsletter and receive a honey of a package of five quick & simple cards guaranteed to make your creativity buzz! Sign up now and let the goodness flow straight to your inbox!
Step-by-Step Instructions:
- Fold the 5-1/2″ x 7-1/4″ Berry Burst cardstock at the 3″ score line to create your base case.
- Fold the 1-1/4″ x 4″ strip of Berry Burst cardstock at the 1″ score line. Glue the strip onto the inside of the card (see sample for placement) so that the score line is lined up with the edge of the card.
- Adhere the 4″ x 5-1/4″ Very Vanilla cardstock inside the card. This will cover the 1″ arm that is glued to the inside of the card.
- Cut 3/4″ off one side of the Meandering Meadows Paper, leaving you 3/4″ x 5-1/4″ and 2-3/4″ x 5-1/4″ pieces. Adhere the 3/4″ strip on this inside of the card, lining up at the edge of the Vanilla cardstock. Adhere the 2-3/4″ piece on the outside flap of the card front.
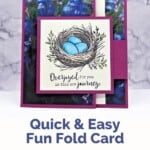
- Using the 2-3/4″ piece of Very Vanilla cardstock, stamp the sentiment at the bottom of the cardstock using Black Memento Ink. Using the same ink, stamp the nest above the sentiment.
- Color in the nest using the Crumb Cake, Tahitian Tide. and Lemon Lime Twist Blends.
- Adhere the Vanilla cardstock to the Berry Burst 3″ square. With the 1-1/2″ Berry Burst “arm” folded into the inside of the card, adhere the Berry Burst Square to the “arm”. Open the card again and now fold the card so the nest is on the outside of the card.

Thank you so much for stopping by and checking out this papercrafting tutorial. I hope you are inspired to create and send cards. If you’d like more detailed directions on how to make this card, feel free to email me. I love sharing how to make cards here on the BZBStamper blog, and I can’t thank you enough for all of your support!

Don’t forget to pin this for later!