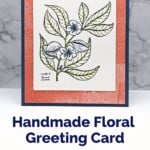
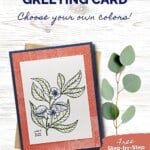
Discover the joy of card making with the Lovely and Sweet Stamp Set by Stampin’ Up! The Lovely & Sweet Stamp Set is your gateway to crafting an alluring and personalized greeting card, suitable for any event or just because. The elegant images of vanilla, cocoa, and almond plants offer a natural and charming backdrop for your heartfelt messages.

For this card, I pulled my colors from the Softly Stippled Designer Paper, as I wanted strong but at the same time neutral colors. I used coordinating Watercolor Pencils to outline the image so that the card was quick & easy to create. If you’d like a brighter color combination, make sure you check out my Color Combination Library for lots of color ideas.

Whether you’re a seasoned crafter or new to the world of card making, this stamp set caters to all skill levels. With its versatile sentiments and the option to add your coloring flair, each card you create will be a unique expression of your creativity.
How To Make This Card
Project Skill Level: Worker Bee
Worker Bee projects are designed for the crafter who has a bit more time and enjoys creating a handmade card that features a technique or tool. In many cases, a Stampin’ Cut & Emboss Machine is required for die-cutting and/or embossing.
Cardstock Measurements:
- Misty Moonlight Cardstock: 5-1/2” x 8-1/2”, scored at 4-1/4”
- Basic White Cardstock: 4” x 5-1/4”
- Softly Stippled Sale-A-Bration Paper: 4” x 5-1/4”
- Basic White Cardstock; 3-1/4” x 4-1/4”


Grab your Free copy
Get 5 Bee-utiful Exclusive
Card Sketches in Your Inbox
Join our newsletter and receive a honey of a package of five quick & simple cards guaranteed to make your creativity buzz! Sign up now and let the goodness flow straight to your inbox!
Step-by-Step Instructions:
- Fold the Misty Moonlight Cardstock in half to create your card base. Adhere the 4” x 5-1/4” Basic White cardstock inside your card.
- Run the Softly Stippled paper through the Cut & Emboss Machine using the Softly Sophisticated Embossing Folder. Adhere to the front of the card.
- Using the 3-1/4” x 4-1/4” piece of Basic White cardstock, stamp the floral image onto the cardstock using Black Memento ink. Use the Balmy Blue and Granny Apple Green Watercolor Pencils to outline the flower and leaf images. There’s no need to blend.
- Adhere the White cardstock to the front of the card to finish.
A Tip from Barb
This is actually a super simple card and I only marked it as a Queen Bee card because of the embossing on the Designer Paper. You can leave the embossing folder off of the card and this will definitely qualify as a simple Busy Bee card!
Thanks for stopping by for today’s card tutorial! My goal is to help you make quick & easy greeting cards for all occasions. If you’d like more detailed directions on how to make this card, feel free to email me. I hope you’ll join me again for more card-making ideas!

Don’t forget to pin this for later!