Learn how the Hearts and Hugs Bundle by Stampin’ Up! makes it easy to create adorable all-occasion cards that you can send to loved ones. It’s like sending a virtual hug to your loved ones! The Hearts & Hugs Bundle is not just for birthdays or thank you notes; it’s your creative companion for any event or sentiment you wish to express.

From a casual hello to a heartfelt congratulations, these furry friends and warm sentiments add a personal touch that goes a long way. This tutorial will show you how to let your feelings take shape in the most beautiful and touching ways possible. Whether you’re a crafting newbie or a seasoned pro, these ideas will inspire you to spread love and joy through every card you create.
How To Make This Card
Project Skill Level: Worker Bee
Worker Bee projects are designed for the crafter who has a bit more time and enjoys creating a handmade card that features a technique or tool. In many cases, a Stampin’ Cut & Emboss Machine is required for die-cutting and/or embossing.
Cardstock Measurements:
- Basic Beige Cardstock: 5-1/2″ x 8-1/2″, scored at 4-1/4″
- Basic White Cardstock: 4″ x 5-1/4″
- Country Lace Designer Paper: 2″ x 5-1/4″ (2 pieces, 2 different patterns)
- Basic Gray Cardstock: 1-3/4″ x 4-1/4″
- Basic White Cardstock: 1-1/2″ x 4″
- Basic White Cardstock: 1-3/4″ x 1-3/4″ (for die-cutting)


Grab your Free copy
Get 5 Bee-utiful Exclusive
Card Sketches in Your Inbox
Join our newsletter and receive a honey of a package of five quick & simple cards guaranteed to make your creativity buzz! Sign up now and let the goodness flow straight to your inbox!
Step-by-Step Instructions:
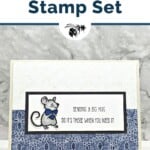
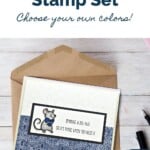
- Fold the Basic Beige cardstock in half at the scoreline to create your base card.
- Adhere the 4″ x 5-1/4″ piece of Basic White cardstock inside the card.
- Adhere the two 2″ x 5-1/4″ pieces of Designer Paper to the front of the card. (See my tip below if you find it difficult to line these 2 papers up on the card front.)
- Stamp the mouse on the scrap of Basic White cardstock using Black Memento ink. Color in the mouse using the Smoky Slate Blends. Color in his ears and cheek using the Light Pretty in Pink Blend. Color in his Bow Tie using the Light Night of Navy Blend.
- Run the mouse through the Stampin’ Cut & Emboss Machine using the mouse die from the Hearts & Hugs Bundle dies.
- Adhere the mouse to the left side of the 1-1/2″ x 4″ piece of Basic White cardstock. Stamp the sentiment to the right of the mouse using Black Memento ink.
- Adhere the White cardstock to the Basic Gray cardstock and adhere to the front of the card to finish.
A Tip from Barb
If you find it difficult to line up the 2 pieces of Designer Paper, do what I do! Cut another piece of 4″ x 5-1/4″ Basic White cardstock mat, adhere the Designer Paper to the mat, and then adhere to the front of the card. (I find it easier to line up the top and bottom that way!)
This card is actually super easy thanks to the pretty paper that we used on the background. If you don’t have the Hearts & Hugs dies, simply stamp the little mouse directly onto the paper and you have a super simple Busy Bee card!
Thanks for stopping by for today’s card tutorial! My goal is to help you make quick & easy greeting cards for all occasions. If you’d like more detailed directions on how to make this card, feel free to email me. I hope you’ll join me again for more card-making ideas!

Don’t forget to pin this for later!