
In this Handmade Easter Card Tutorial, I’ll show you how you can make this adorable Easter Card using the Easter Friends Stamp Set by Stampin’ Up! It’s easier than you may think!

View more stamped samples & inspiration here
While there’s a lot going on in this card, it’s easier to create than you might think. And the good news is that I have a complete written Tutorial below that you can download and save!
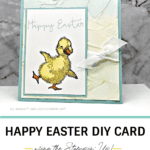
First off, how adorable is that duckie from the Easter Friends Stamp Set by Stampin’ Up? As the focal point of the card, he just makes you smile!
But a close second is that gorgeous background! First, the white cardstock was sponged with 3 pastel colors, and then run through the Cut & Emboss Machine using the Painted Texture 3D Embossing Folder (my all-time favorite embossing folder!) There’s just something about that 3D Folder that makes you want to touch the card!
If you don’t have a Cut & Emboss Machine, no worries, the card will still look adorable with just the sponged background. I promise.
The duckie was then colored in using our Stampin’ Blends Alcohol Markers for a beautifully vibrant effect. Let’s dig into the details of how I made this card…
Project Measurements
- Pool Party: 4-1/4” x 11”, scored at 5-1/2” and 2-5/8” x 3-5/8”
- Basic White: 4” x 5-1/4” (2) and 2-1/2” x 3-1/2”
Project Instructions
1. Fold the 4-1/4” x 11” piece of Pool Party cardstock in half at the score line. Burnish well with your Bone Folder to create a crisp fold.
2. Adhere one of the 4” x 5-1/4” pieces of Basic White cardstock inside the base card.
3. Using the other 4” x 5-1/4” piece of Basic White Cardstock, run it through the Cut & Emboss Machine using the Painted Texture 3D Embossing Folder.
4. Using one of the Blending Brushes and the So Saffron ink pad, lightly blend ink in the center of the embossed White cardstock.
5. Using another Blending Brush and the Pear Pizzazz ink pad, blend color at the bottom of the white cardstock.
6. Using a clean Blending brush and the Pool Party ink pad, blend color at the top of the White cardstock. If necessary, go back with the So Saffron Blending Brush and blend the 3 colors together at the ink line so that it’s a smooth transition of color.
7. Wrap about 12” of the White Flowers for Every Season Ribbon around the embossed cardstock and tie into a knot or bow on the right side.
8. On the 2-1/2” x 3-1/2” piece of Basic White cardstock, stamp the duck at the bottom using Soft Suede ink. Color in using the Light So Saffron & Light Pumpkin Pie Blends.
9. Stamp the sentiment above the duck using Pool Party ink.
10. Adhere the White cardstock to the 1/8” larger Pool Party mat and adhere to the card base using adhesive to finish.

Supplies Used on this Project


Pin This
Pin the image below to your board for all those handmade Easter card ideas you have saved so when you have an opportunity for a fun cardmaking session you will be able to get right to the creative part!

- Get a Free Tutorial Every Week!
- Shop 24/7 in your PJ’s
- Queen Bee Rewards – Earn FREE Stamps!
- View the 2024-2025 Annual Catalog
- View NEW Online Products
- Monthly Crafting Kit
Thanks for stopping by today, I hope you enjoyed this papercrafting tutorial. If you have a question or if I can help you with anything, please leave me a comment. I’d love to hear from you!


I love your Easter ducky card! Its adorable and I love the embossing folder you used!
Oh my gosh Michele – thank you! I’m so glad you liked it! ? You just made my day!