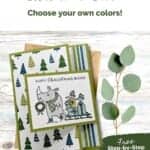
You’ll love how easy it is to make this handmade Christmas Card with the Festive and Fun Stamp Set by Stampin’ Up! Add some pretty paper and a fun fold and you’re sure to impress your friends & family!

From new cardmakers to seasoned artists, this stamp set is designed to bring a smile to everyone’s face. Whether creating a dynamic Christmas scene or a simple heartfelt tag, the options are endless. So gather your favorite coloring tools and let’s sprinkle some festive cheer together with this handmade Christmas Card!
How To Make This Card
Project Skill Level: Worker Bee
Worker Bee projects are designed for the crafter who has a bit more time and enjoys creating a handmade card that features a technique or tool. In many cases, a Stampin’ Cut & Emboss Machine is required for die-cutting and/or embossing.
Cardstock Measurements:
- Old Olive Cardstock: 5-1/2” x 7-1/2”, scored at 3-1/4”
- Basic White Cardstock: 4” x 5-1/4”
- Walk in the Forest Paper, Pattern #1: 3” x 5-1/4”
- Walk in the Forest Paper, Pattern #2: 1” x 5-1/4”
- Old Olive Cardstock: 2-3/4” x 4”, scored at 3-1/2”
- Basic White Cardstock: 2-1/2” x 3-1/4”


Grab your Free copy
Get 5 Bee-utiful Exclusive
Card Sketches in Your Inbox
Join our newsletter and receive a honey of a package of five quick & simple cards guaranteed to make your creativity buzz! Sign up now and let the goodness flow straight to your inbox!
Step-by-Step Instructions:
- Fold the 5-1/2” x 7-1/2” Old Olive cardstock at 3-1/2” to create your card base.
- Adhere the 4” x 5-1/4” piece of Basic White cardstock on the inside of card.
- Fold the 2-3/4” x 4” piece of Old Olive cardstock at the 3-1/2” score line. Glue the 1/2” flap on the back of the 1” x 5-1/4” piece of Walk In The Forest paper and then adhere to the inside of card so that it lines up with the edge of the Basic White Cardstock. (This will create your flap.)
- Adhere the 3” x 5-1/4” piece of Walk in the Forest Paper to the front flap of the card.
- Using the 2-1/2” x 3-1/4” piece of Basic White cardstock, stamp the sentiment at the top using Black Memento ink. Stamp the Rhino image using the same Black ink.Color in the stamped image using the Blends. Adhere the White cardstock to the Old Olive “flap” using adhesive to finish.
A Tip from Barb
This is actually a super simple card, but I decided to upgrade it from a Busy Bee card to a Worker Bee card only because it takes a few extra steps to get the Fun Fold done correctly. If you’re a beginner stamper, don’t let the rating scare you – make a “mock” copy of the fun fold because after the first time you make this card, you’ll find it very easy to duplicate!
Thank you so much for stopping by! I hope you are inspired to make simple handmade cards for friends this week! If you’d like more detailed directions on how to make this card, feel free to email me. Give this papercrafting tutorial a try ? Check back soon for more card making ideas!

Don’t forget to pin this for later!

Supplies Used On This Project:


Price: $12.50