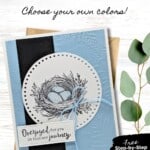
Create this adorable Baby Card using the Everyday Details Stamp Set by Stampin’ Up! The arrival of a new baby is a momentous occasion, filled with joy, hope, and endless love. What better way to celebrate this new beginning than with a handmade Baby card crafted from the heart?

The Everyday Details Stamp Set by Stampin’ Up! provides a versatile array of hand-drawn images perfect for creating a card that captures the sweetness and excitement of welcoming a new member to the family. Whether you’re congratulating a friend, family member, or colleague, this tutorial will inspire you to craft a keepsake card that embodies your warmest wishes for the baby and their parents.
How To Make This Card
Project Skill Level: Worker Bee
Worker Bee projects are designed for the crafter who has a bit more time and enjoys creating a handmade card that features a technique or tool. In many cases, a Stampin’ Cut & Emboss Machine is required for die-cutting and/or embossing.
Cardstock Measurements:
- Basic White Cardstock: 5-1/2″ x 8-1/2″, scored at 4-1/4″
- Balmy Blue Cardstock: 4″ x 5-1/4″
- Basic Black Cardstock: 1-1/2″ x 5-1/4″
- Basic White Cardstock: 4-1/4″ x 5-1/2″ (for die-cutting)


Grab your Free copy
Get 5 Bee-utiful Exclusive
Card Sketches in Your Inbox
Join our newsletter and receive a honey of a package of five quick & simple cards guaranteed to make your creativity buzz! Sign up now and let the goodness flow straight to your inbox!
Step-by-Step Instructions:
- Fold the 5-1/2” x 8-1/2” Basic White cardstock in half at the 4-1/4” score line.
- Run the 4” x 5-1/4” piece of Balmy Blue cardstock through the Cut & Emboss Machine using the Fern 3D Embossing Folder. Adhere to the front of the card.
- Adhere the 1-1/2” x 5-1/4” piece of Basic Black cardstock to the front of the card, about 1/2” over from the left edge of Balmy Blue cardstock.
- Using a 4-1/4” x 5-1/2” piece of Basic White cardstock, run through the Cut & Emboss Machine and cut out the 3-1/4” dotted circle and the 7/8” x 2-1/4” rectangle die from the Everday Details dies.
- Stamp the sentiment onto the rectangle die and the birds nest onto the circle die. Color in the eggs using the Balmy Blue Blends, creating small “speckles” with the darker Blend if desired. Adhere the circle onto the card front, overlapping the Black strip, and add the sentiment tag below that using Stampin’ Dimensionals.
- Cut about 8” of Balmy Blue Bakers Twine and tie it into a bow; adhere to the nest using a Mini Glue Dot as shown in the sample.
A Tip from Barb
This is actually a very easy card to create as long as you have a Cut & Emboss Machine and the Everyday Details Dies. On the eggs, I used a very light touch with the Blends and added “speckles” on the eggs with the Brush Tip of the Light Balmy Blue Blend. I purposely didn’t color anything else to keep the focus on the eggs, but you definitely could add more color if you’d like!
Thank you so much for stopping by and checking out this papercrafting tutorial. I hope you are inspired to create and send cards. If you’d like more detailed directions on how to make this card, feel free to email me. I love sharing how to make cards here on the BZBStamper blog, and I can’t thank you enough for all of your support!

Don’t forget to pin this for later!