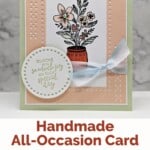
Discover how easy it is to make this handmade card with this Tutorial featuring the Everyday Details Bundle. The beauty of the Everyday Details Bundle by Stampin’ Up! lies in its versatility, making it a quintessential tool for crafting elegant all-occasion cards. Whether you’re marking an anniversary, sending well wishes, or simply saying “hello,” this bundle’s blend of hand-drawn stamps and intricate dies ensures your card will be both unique and heartfelt.

I wanted soft, subtle colors for this card, so I went with one of my favorite color combinations – Soft Sea Foam, Petal Pink, and a pop of color with Cajun Craze. If you’d prefer something brighter, make sure you check out my Color Combination Library where you’re sure to find a combination you’ll like.

Whether you’re a seasoned crafter or just starting out, you’ll find joy in expressing your creativity and sentiments through handmade cards. This Tutorial will give you directions on how to make a beautiful card. that will help you make every moment memorable!
How To Make This Card
Project Skill Level: Worker Bee
Worker Bee projects are designed for the crafter who has a bit more time and enjoys creating a handmade card that features a technique or tool. In many cases, a Stampin’ Cut & Emboss Machine is required for die-cutting and/or embossing.
Cardstock Measurements:
- Soft Sea Foam Cardstock: 5-1/2″ x 8-1/2″, scored at 4-1/4″
- Basic White Cardstock: 3-7/8″ x 5-1/8″ (2 pieces)
- Petal Pink Cardstock: 3-3/4″ x 5″
- Basic White & Soft Sea Foam Cardstocks: 2-1/4″ x 2-1/4″ (for die-cutting)


Grab your Free copy
Get 5 Bee-utiful Exclusive
Card Sketches in Your Inbox
Join our newsletter and receive a honey of a package of five quick & simple cards guaranteed to make your creativity buzz! Sign up now and let the goodness flow straight to your inbox!
Step-by-Step Instructions:
- Fold the Soft Sea Foam cardstock in half at the score line.
- Adhere one of the 3-7/8″ x 5-1/8″ pieces of Basic White cardstock inside the card.
- Run the Petal Pink cardstock through the Stampin’ Cut & Emboss Machine and cut out the center using the Rectangle Die with the 2-1/4″ x 3-3/4″ opening. Run this piece through again and add the “line” die as shown in the sample.
- Line up the Petal Pink cardstock onto the other piece of 3-7/8″ x 5-1/8″ Basic White cardstock. Stamp the vase image using Black Memento ink so that it’s centered inside the rectangle opening.
- Color in the vase image using the Petal Pink, Calypso Coral, and Soft Sea Foam Blends.
- Adhere the Petal Pink cardstock to the Basic White cardstock. Tie the Balmy Blue ribbon around both cardstocks and tie into a bow or knot on the right side. Adhere the cardstocks to the front of the card.
- Stamp the sentiment onto the 2-1/4″ scrap of Basic White cardstock using Soft Sea Foam ink. Run this and the 2-1/4″ scrap of Soft Sea Foam cardstock through the Cut & Emboss Machine and die-cut using the 1-7/8″ circle.
- Adhere the White die-cut circle to the Soft Sea Foam die-cut circle, rotating them so that the Soft Sea Foam cardstock (not circles) show through the White circle. Adhere to the card front as shown in the sample using Stampin’ Dimensionals.
- To finish, add a Gold or Calypso Coral Iridescent Pastel Gem in the center of the large flower.
A Tip from Barb
This project is pretty straight-forward with the exception of the sentiment circle. If you have trouble lining up the white circle onto the Soft Sea Foam circle, just leave it off. The card will still look fabulous!
Thank you so much for stopping by and checking out this papercrafting tutorial. I hope you are inspired to create and send cards. If you’d like more detailed directions on how to make this card, feel free to email me. I love sharing how to make cards here on the BZBStamper blog, and I can’t thank you enough for all of your support!

Don’t forget to pin this for later!