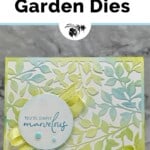
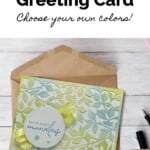
Make your own paper garden with these Gorgeous Garden Dies. Add these die-cut beauties to your next handmade card for an intricate background you can adorn in any way you like. Add a stamped sentiment, additional die-cut pieces, and some ribbon or embellishments to customize the look.

I wanted a springtime feel for this card, so I went with a soft color palette: Lemon Lolly, Balmy Blue and Lemon Lime Twist. I love how it turned out! If you’d like something brighter, make sure to check out my Color Combination Library.

I started this card in mind using one of the beautiful sentiments in the Perennial Postage sentiment-only stamp set. To finish off the card, I opted for some Lemon Lolly Ribbon and used a circle punch for a quick and easy sentiment to round out the card.
How To Make This Card
Project Skill Level: Worker Bee
Worker Bee projects are designed for the crafter who has a bit more time and enjoys creating a handmade card that features a technique or tool. In many cases, a Stampin’ Cut & Emboss Machine is required for die-cutting and/or embossing.
Cardstock Measurements:
- Basic White Cardstock: 5-1/2” x 8-1/2”, scored at 4-1/4”
- Basic White Cardstock: 4-1/4” x 5-1/2”
- Basic White Cardstock: 2-3/4” x 2-3/4”


Grab your Free copy
Get 5 Bee-utiful Exclusive
Card Sketches in Your Inbox
Join our newsletter and receive a honey of a package of five quick & simple cards guaranteed to make your creativity buzz! Sign up now and let the goodness flow straight to your inbox!
Step-by-Step Instructions:
- Fold the Basic White cardstock in half to create your card base.
- Using a small Blending Brush, ink up using the Lemon Lolly ink pad and sponge randomly on the 4-1/4” x 5-1/2” piece of Basic White Cardstock. Repeat with the other 2 colors, using a different Blending Brush each time.
- Run the White cardstock through the Cut & Emboss Machine using the Gorgeous Garden leaf die. Adhere to the front of the card.
- Punch the 2-3/8” circle out of the 2-3/4” piece of Basic White cardstock. Sponge the edges using the Balmy Blue ink and Blending Brush. Stamp the sentiment in the center of the circle using Balmy Blue ink.
- Cut 9” of the Lemon Lolly Ribbon and zig-zag into 3 equal lengths, adhering to the back of the punched circle. Adhere to the card front using Stampin’ Dimensionals.
- To finish, add 2-3 of the Pool Party Rainbow Dots to the circle as desired.
Thanks for stopping by for today’s card tutorial! My goal is to help you make quick & easy greeting cards for all occasions. If you’d like more detailed directions on how to make this card, feel free to email me. I hope you’ll join me again for more card-making ideas!

Don’t forget to pin this for later!