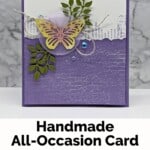
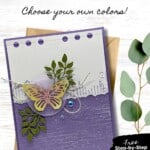
Craft a beautiful Butterfly Card with the Notes of Nature Bundle by Stampin’ Up!, This Bundle blends the art of stamping and die-cutting to easily create enchanting papercrafting projects. Imagine stamping these exquisite designs and bringing them to life with vibrant colors, then pairing them with our perfectly matched Dies to cut out your stamped images with precision and ease.

There are so many little touches added to this card – the die-cut journal border that is part of the Bundle dies, the Brick 3-D Embossing Folder that was sponged in White ink to highlight the bricks, and the torn paper layer that adds even more depth to the card. All of those small touches truly add up to a Queen Bee card, and yet they were so easy to do thanks to the Stampin’ Cut & Emboss Machine!
The person I was creating this card for loves purple, so I went with one of my standard color palettes: Heather Highland, Old Olive and Daffodil Delight. If you’d like something less purple, check out my Color Combination Library for more color combination ideas.

Whether you’re crafting a unique project like this one or producing multiples, this bundle is your ally, streamlining your creative process. It’s not just crafting; it’s an effortless dance between creativity and nature’s whimsy! It’s considered good luck when a butterfly crosses your path, so create and send a handmade butterfly greeting card to a loved one today!
How To Make This Card
Project Skill Level: Queen Bee
Queen Bee projects are designed for experienced papercrafters. In most cases, these cards involve multiple techniques and products, including a Stampin’ Cut & Emboss Machine for die-cutting and/or embossing. These projects are often more involved – but the results are worth it!
Cardstock Measurements:
- Highland Heather Cardstock: 5-1/2″ x 8-1/2″, scored at 4-1/4″
- Basic White Cardstock: 4″ x 5-1/4″
- Highland Heather Cardstock: 4″ x 5-1/4″
- Basic White Cardstock: 3-1/4″ x 4″
- Old Olive Cardstock: 3″ x 4″ (for die-cutting)
- Vellum: 2-1/2″ x 2-1/2″ (for punching)


Grab your Free copy
Get 5 Bee-utiful Exclusive
Card Sketches in Your Inbox
Join our newsletter and receive a honey of a package of five quick & simple cards guaranteed to make your creativity buzz! Sign up now and let the goodness flow straight to your inbox!
Step-by-Step Instructions:
- Fold the Highland Heather cardstock in half at the score line to create the card base.
- Adhere the 4″ x 5-1/4″ piece of Basic White cardstock inside the card.
- Run the 4″ x 5-1/4″ piece of Highland Heather cardstock through the Stampin’ Cut & Emboss Machine using the Exposed Brick 3D Embossing Folder.
- Using the White Craft Ink and a sponge dauber, lightly sponge White Ink on the bottom of the cardstock in splotches – do not cover the entire cardstock, just small areas as shown in the sample. Set aside to dry.
- Using the 3-1/4″ x 4″ piece of Basic White cardstock, run through the Cut & Emboss Machine using the circle border die from the Notes of Nature Bundle. Tip: line up the border die at the top of the 4″ side.
- Using Highland Heather Ink, stamp the Field Notes stamp so that the words go up & down, not left to right. See sample for placement. Repeat if necessary so that the entire bottom is stamped. Tear off the bottom 1/2″ using your fingers.
- Adhere the White cardstock from Step #6 to the Highland Heather cardstock from Step #4 and adhere to the card front using Stampin’ Dimensionals.
- Run the Old Olive cardstock through the Stampin’ Cut & Emboss Machine and cut out 2 of the large leaf clusters. Punch the 1-3/4″ circle out of the Vellum cardstock. Adhere the leaves to the back of the vellum circle using dots of glue only at the base of the leaf dies.
- Tie a large bow using the Linen Thread and use a dot of adhesive to secure in the center of the Vellum Circle. Adhere the circle to the card as shown in the sample, using one Stampin’ Dimensional in the center of the circle.
- Using one of the Paper Butterfly accents, use a Sponge Dauber and Flirty Flamingo ink and carefully sponge in on the center of the butterfly. Using another Sponge Dauber and Daffodil Delight ink, sponge the remaining butterfly until the entire butterfly is inked. Adhere to the center of the Vellum Circle so that the butterfly hides any adhesive showing through the circle.
- To finish, add 3 of the Iridescent Rhinestones to the front of the card as desired.
Thank you so much for stopping by and checking out this papercrafting tutorial. I hope you are inspired to create and send cards. If you’d like more detailed directions on how to make this card, feel free to email me. I love sharing how to make cards here on the BZBStamper blog, and I can’t thank you enough for all of your support!

Don’t forget to pin this for later!