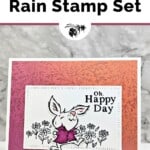
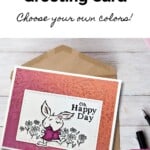
Spring Crafting Oh Happy Day Bunny Card featuring the Playing in the Rain Stamp Set by Stampin’ Up! This adorable card showcases how you can combine the jubilant bunny from the Playing in the Rain Stamp Set with the beautiful hues of the Thoughtful Designs Specialty Designer Series Paper and the innovative Radiating Stitches Dies.

Your handmade card will not only capture the essence of celebration but also the beauty of craftsmanship. Whether for a birthday, a thank you, or just because, this card will surely bring a smile to anyone’s day.
Let’s dive into this creative adventure and spread some handmade happiness!
How To Make This Card
Project Skill Level: Worker Bee
Worker Bee projects are designed for the crafter who has a bit more time and enjoys creating a handmade card that features a technique or tool. In many cases, a Stampin’ Cut & Emboss Machine is required for die-cutting and/or embossing.
Cardstock Measurements:
- Basic White Cardstock: 5-1/2″ x 8-1/2″, scored at 4-1/4″
- Thoughtful Designs Specialty Paper: 4″ x 5-1/4″
- Basic White Cardstock: 4-1/4″ x 5-1/2″


Grab your Free copy
Get 5 Bee-utiful Exclusive
Card Sketches in Your Inbox
Join our newsletter and receive a honey of a package of five quick & simple cards guaranteed to make your creativity buzz! Sign up now and let the goodness flow straight to your inbox!
Step-by-Step Instructions:
- Fold the Basic White cardstock in half at the scoreline to create your card base.
- Adhere the Thoughtful Designs to the front of the card.
- Stamp the Bunny in one corner of the 4-1/4″ x 5-1/2″ piece of Basic White cardstock using the Black Memento ink pad.
- Run the Basic White cardstock through the Stampin’ Cut & Emboss Machine and cut out the bunny using the Playing in the Rain dies and use the Radiating Stitches Dies to cut out the 1-5/8″ x 4″ rectangle.
- Using the Stitched Rectangle, stamp the sentiment in the upper right corner using the Black Memento ink pad; stamp the florals 2-3 times using the same ink. Adhere to the front of the card as shown in the sample.
- Color in the Bunny using the Dark Petunia Pop Blend for her jacket and the Light Pretty in Pink Blend for the ears and nose.
- To finish, adhere the Bunny to the center of the flowers, just to the left of the sentiment as shown in the sample.
A Tip from Barb
I kept the coloring on this card to a minimum as I wanted to balance the focal point from the rabbit to that gorgeous Designer Paper, but you could easily color in the flowers for more of a punch on this card! I’d recommend using the Calypso Coral, Daffodil Delight, and Shy Shamrock or Granny Apple Green Blends.
Thanks for stopping by for today’s card tutorial! My goal is to help you make quick & easy greeting cards for all occasions. If you’d like more detailed directions on how to make this card, feel free to email me. I hope you’ll join me again for more card-making ideas!

Don’t forget to pin this for later!