There’s something about spring cards that just feels hopeful. Lighter colors, softer details, and that sense of everything starting fresh again. This Spring Card Using The Easter Basket Bundle is one of those projects that feels calm to make and happy to send. It’s the kind of card you sit with for a bit, enjoy the layers coming together, and then immediately start thinking about who would smile when it shows up in their mailbox.
Spring isn’t just a season. It’s a feeling. It’s checking in on someone, celebrating small moments, or simply letting another person know you were thinking of them. This card works beautifully for Easter, but it doesn’t have to stop there. It’s also perfect for a spring hello, a little encouragement, or a piece of happy mail that doesn’t need a reason.

JULY ordering Bonus
A Bonus for You!
Any order you place in July includes a free 10-project tutorial featuring the Velvet Meadow Suite that you can use with any Bundle in your stamp stash.
It’s filled with cozy, step-by-step card ideas to spark your creativity when your order arrives — so you’re not staring at supplies wondering where to start.
This is not a beginner card, but it’s also not overwhelming. If you enjoy die-cutting, layering, and taking your time with details, this project fits right into that comfortable middle space. Using the Easter Basket Bundle Dies along with the Stampin’ Cut & Emboss Machine actually simplifies the process because the shapes are clean, precise, and designed to work together.
One of my favorite parts of this card is how approachable the coloring is. The bunny and carrot were colored using Stampin’ Blends, keeping things simple and relaxed. You don’t need fancy techniques here. Just soft shading, gentle lines, and a few minutes of quiet coloring time.

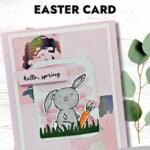
The soft spring tones on this card come from the Splash of Sparkles Specialty Designer Series Paper, layered behind the focal image for a subtle wash of color and shimmer. The mix of pinks, greens, and orange keeps the card feeling fresh without being busy, and the layered panels add depth without stealing the spotlight from the bunny.
This spring card uses layered die-cut pieces, soft patterned paper, and simple coloring to create a cheerful design that feels special without feeling fussy. It’s a great project when you want to slow down, enjoy the process, and create something that’s ready to brighten someone’s day.
How To Make This Card
You’ll find the full supply list and step-by-step instructions below.

Spring Card featuring the Easter Basket Bundle
Supplies Needed
- Bubble Bath Cardstock: 5-1/2" x 8-1/2" (scored at 4-1/4")
- Basic White Cardstock: 4" x 5-1/4" (inside card)
- Basic White Cardstock: 3-3/4" x 5-1/4"
- Splash of Sparkle Specialty Paper: 3-1/2" x 5" (Plain Bubble Bath Pattern)
- Splash of Sparkle Specialty Paper: 1-3/4" x 2-1/2" (Bubble Bath with Silver Semi-Circles Pattern – need 2 pieces)
- Splash of Sparkle Specialty Paper: 2-1/2" x 3-1/2" (Opposite Side of Previous Piece – try to cut only the Bubble Bath "wash")
- Bubble Bath Cardstock: 1/2" x 2" (for die-cutting, sentiment label)
- Basic White Cardstock: 3" x 3" (for die-cutting)
- Garden Green Cardstock: 1" x 3" (for die-cutting)
Instructions
- Fold the Bubble Bath cardstock in half at the score line to create your card base.
- Adhere the 4" x 5-1/4" piece of Basic White cardstock inside the card.
- Using the 2 pieces of 1-3/4" x 2-1/2" Splash Of Sparkles Specialty Paper, adhere one piece in the upper left corner and one in the lower right corner of the 3-1/2" x 5" piece of Splash of Sparkles Specialty Paper. Adhere to the 3-3/4" x 5-1/4" piece of Basic White cardstock and then adhere to front of card.
- Using the 2-1/2" x 3-1/2" of Splash of Sparkles Specialty Paper, run through the Stampin' Cut & Emboss Machine and die-cut with the 2-1/4" x 3" Nested Essentials Rectangle Die. Set aside.
- Run the Garden Green cardstock through the Cut & Emboss Machine and die-cut the grass using the Easter Basket Bundle die. Set aside.
- Using the 3" square of Basic White cardstock, stamp the bunny using Tuxedo Black Memento ink. Color in using the Smoky Slate and Light Bubble Bath Stampin' Blends. Ink up the carrot using the Tuxedo Black Memento ink pad, tap off once on your scratch paper and stamp onto the Basic White cardstock. Color in using the Pumpkin Pie and Granny Apple Green Blends.
- Run the stamped Basic White cardstock through the Cut & Emboss Machine and die-cut the Bunny and carrot using the Easter Basket Bundle dies.
- Adhere the Bunny to the center of the Nested Essentials die-cut from Step #4. Add the die-cut carrot to his hand using adhesive. Glue the grass over the bunny and trim if necessary. Adhere to the center of the card front.
- Using scissors, but the left side of the 1/2" strip of Bubble Bath cardstock at an angle. Stamp the sentiment onto the center of the cardstock using Tuxedo Black Memento ink. Adhere to the card, above and to the left of the bunny using Stampin' Dimensionals to finish.
Notes
Worker Bee projects are designed for the crafter who has a bit more time and enjoys creating a handmade card that features a technique or tool. In many cases, a Stampin’ Cut & Emboss Machine is required for die-cutting and/or embossing.
Once everything is assembled, this card feels sturdy, polished, and satisfying. The layers add just enough dimension, and the die-cut basket gives the design a finished look that feels worth the extra time. It’s the kind of card you’re proud to slip into an envelope.
In the end, the most important part of any handmade card is sending it. When you drop it in the mail, you’re turning paper and ink into a real moment of connection. That small envelope carries kindness, encouragement, and a reminder that someone was thinking of them. It doesn’t have to be perfect or elaborate. What matters is that it’s sent, received, and felt.
Love this color combo? Pin it for later!

Supplies Used:


Price: $16.50


One more little perk while you’re shopping. Each month there’s a Product of the Month you can add for just $5 when your order reaches $75. It’s a fun surprise that’s not in the catalog and only available while supplies last. Click To Learn More
If you enjoy simple, cozy cardmaking like this, you’d love the creative support we share inside the Creative Living Room. If you have questions about today’s tutorial, please email me for detailed steps. Inspire your craft with more ideas—join me over on Pinterest!


Grab your Free copy
Get 5 Bee-utiful Exclusive
Card Sketches in Your Inbox
Join our newsletter and receive a honey of a package of five quick & simple cards guaranteed to make your creativity buzz! Sign up now and let the goodness flow straight to your inbox!