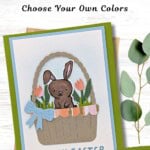
Some cards just feel like spring the moment you see them. This Happy Easter Card using the Easter Basket Bundle by Stampin’ Up!® has that fresh, cheerful energy that makes you smile before you even start crafting. It’s layered, detailed, and one of those projects you sit down to make when you’re ready to enjoy the process and play with your supplies a little more.
Easter cards like this are about more than the holiday itself. They’re about welcoming a new season, celebrating fresh starts, and sending something bright through the mail. While this card clearly works for Easter, it also captures that general spring feeling we all look forward to after winter fades away.

JULY ordering Bonus
A Bonus for You!
Any order you place in July includes a free 10-project tutorial featuring the Velvet Meadow Suite that you can use with any Bundle in your stamp stash.
It’s filled with cozy, step-by-step card ideas to spark your creativity when your order arrives — so you’re not staring at supplies wondering where to start.
This is not a beginner card, but it’s not difficult to make either, thanks to the Stampin’ Cut & Emboss Machine. It’s a great project for stampers who enjoy die cutting, layering, and seeing a design come together piece by piece. If you like cards that feel intentional and thoughtfully assembled, this one is very satisfying to make.

Even with multiple elements, nothing here feels overly complicated. Each piece builds on the next, which keeps the process enjoyable instead of overwhelming. It’s the kind of card you make when you want to slow down and really enjoy creating.
The color combination feels soft, fresh, and spring-ready. Green, light blue, and warm neutral tones work beautifully together and keep the design grounded. The basket die-cut from neutral cardstock adds structure, while the patterned paper brings in a hint of shimmer without overpowering the card. The subtle sparkle feels special but still very wearable for everyday Easter mail.
The bunny was colored using the Bronze and Ivory Stampin’ Blends, Stampin’ Up!’s version of Alcohol Markers. Using just one light and one dark marker creates soft highlights and shadows without any stress. It’s a great reminder that you don’t need a big collection of markers to get beautiful results. The rest of the colors came from the fabulous Splash of Sparkles Designer Paper.
How To Make This Card
You’ll find the full supply list and step-by-step instructions below.

Happy Easter Card using the Easter Basket Bundle
Supplies Needed
- Granny Apple Green Cardstock: 5-1/2" x 8-1/2" (scored at 4-1/4)
- Basic White Cardstock: 4" x 5-1/4"
- Balmy Blue Cardstock: 3-3/4" x 5-1/4"
- Basic White Cardstock: 3-1/2" x 5"
- Crumb Cake Cardstock: 3" x 4" (die-cut basket)
- Balmy Blue Cardstock: 1-1/2" x 1-1/2" (die-cut bow)
- Splash of Sparkles Specialty Paper: 1" x 3" (die-cut trim and flowers)
- Granny Apple Green Cardstock: 1" x 3" (die-cut grass)
- Garden Green Cardstock: 2" x 3" (die-cut stems/leaves)
- Basic White Cardstock: 1-1/2" x 3" (die-cut bunny)
Instructions
- Fold the Granny Apple Green cardstock at the score line to create your card base. Adhere the 4" x 5-1/4" piece of Basic White cardstock inside the card.
- Using a Blending Brush and the Balmy Blue ink pad, lightly sponge the center of the 3-1/2" x 5" Basic White cardstock. Stamp the "Happy Easter" sentiment at the bottom of the cardstock using the Balmy Blue ink pad.
- Adhere the Basic White cardstock to the 3-3/4" x 5-1/4" Balmy Blue cardstock; adhere to the card front.
- Stamp the bunny onto the 1-1/2" x 3" scrap of Basic White cardstock using Tuxedo Black Memento ink. Color in using the Bronze & Ivory Stampin' Blends. Run through the Stampin' Cut & Emboss Machine and die-cut the bunny using the Easter Basket dies. Set aside.
- Using the Stampin' Cut & Emboss Machine and the Easter Basket Dies, die-cut the basket from the Crumb Cake cardstock, the bow from the Balmy Blue cardstock, and the basket trim plus 2 flowers from the Splash of Sparkles Specialty Paper. Also cut the grass from the Granny Apple Green scrap and 2 of the stem/leaves from the Garden Green cardstock.
- To assemble all the die-cuts, adhere the Splash of Sparkles Specialty Paper trim to the top of the basket; add the Balmy Blue bow. Add the grass to the back of the basket. Using the Bunny die-cut as a guide, adhere the 2 stems/flowers to the cardstock, then add the bunny using adhesive. Adhere the basket "over" the bunny using Stampin' Dimensionals only on the basket (not the handle).
Notes
Worker Bee projects are designed for the crafter who has a bit more time and enjoys creating a handmade card that features a technique or tool. In many cases, a Stampin’ Cut & Emboss Machine is required for die-cutting and/or embossing.
Once finished, this card feels sturdy, detailed, and extra special. You can see the time and care that went into it, which makes it even more meaningful to send. It’s one of those cards you’re proud to tuck into an envelope.
Easter cards carry a message of hope and renewal, and sending one by mail is a beautiful way to stay connected. A handmade card like this feels personal and thoughtful, reminding someone they were worth the extra effort.
Love this color combo? Pin it for later!

Supplies Used:


Price: $16.50


One more little perk while you’re shopping. Each month there’s a Product of the Month you can add for just $5 when your order reaches $75. It’s a fun surprise that’s not in the catalog and only available while supplies last. Click To Learn More
If you enjoy simple, cozy cardmaking like this, you’d love the creative support we share inside the Creative Living Room. If you have questions about today’s tutorial, please email me for detailed steps. Inspire your craft with more ideas—join me over on Pinterest!


Grab your Free copy
Get 5 Bee-utiful Exclusive
Card Sketches in Your Inbox
Join our newsletter and receive a honey of a package of five quick & simple cards guaranteed to make your creativity buzz! Sign up now and let the goodness flow straight to your inbox!