When it comes to crafting stunning, handmade greeting cards, versatility is key. That’s why I’m excited to showcase the Frosted Forest Decorative Masks by Stampin’ Up! These incredible masks are not just for one season—they’re perfect for creating beautiful cards all year round. Whether you’re crafting for spring, summer, autumn, or winter, the Frosted Forest Decorative Masks will add depth, dimension, and a touch of magic to your projects.

With six unique designs, these masks allow you to layer tree images to create intricate and realistic scenes. Use Blending Brushes to apply different shades of ink for a multi-dimensional look, or try Embossing Paste to add texture and depth. The possibilities are endless, and the results are always impressive.
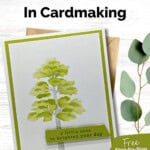
For this card, I wanted something bright for Spring and Summer so I went with the color palette of Smoky Slate, Lemon Lime Twist and Granny Apple Green. You can find tons of inspiration for different color combinations for all the seasons in my Color Combination Library – make sure you check it out!
With the Frosted Forest Decorative Masks, you can create stunning, textured greeting cards that capture the essence of every season. These masks are a must-have for any crafter looking to add depth and dimension to their projects. So grab your crafting supplies and let your creativity shine all year round!
How To Make This Card
Project Skill Level: Busy Bee
Busy Bee projects are designed for the beginner or busy papercrafter. This is a basic cardmaking project that can be achieved by someone who has never made a handmade card before. You can view more Busy Bee cards here.
Cardstock Measurements:
- Basic White Cardstock: 5-1/2″ x 8-1/2″, scored at 4-1/4″
- Lemon Lime Twist Cardstock: 4” x 5-1/4”
- Basic White Cardstock: 3-3/4” x 5”
- Lemon Lime Twist Cardstock: 1/2” x 2-3/4”


Grab your Free copy
Get 5 Bee-utiful Exclusive
Card Sketches in Your Inbox
Join our newsletter and receive a honey of a package of five quick & simple cards guaranteed to make your creativity buzz! Sign up now and let the goodness flow straight to your inbox!
Step-by-Step Instructions:
- Fold the Basic White cardstock in half to create your card base.
- Adhere the Lemon Lime Twist Cardstock to the front of the card.
- Use a Post-In Note or Washi Tape to tape down the 3-3/4” x 5” piece of Basic White cardstock onto your scratch paper.
- Line up the Masks so that the notches in the upper right corner match. Layer Mask #1 (with the tree branches) over the White cardstock, taping it down with Washi Tape so it doesn’t move.
- Using a small Blending Brush, lightly sponge Smoky Slate ink over the mask. When done, remove the mask and set aside.
- Layer the 2nd Mask (larger leaves) onto the cardstock, lining up this mask with the sponged tree trunk. Using another Blending Brush, lightly sponge Lemon Lime Twist over the mask.
- Remove the mask and line up the last mask, taping down if desired. Use the Blending Brush to add Granny Apple Green ink over the mask. Remove the mask and adhere the Basic White cardstock to the front of the card.
- Stamp the sentiment onto the 1/2” strip of Lemon Lime Twist cardstock, using Granny Apple Green Ink. Using your scissors, cut the right side of your cardstock at an angle.
- Adhere the sentiment strip of the cardstock onto the card front using Stampin’ Dimensionals to finish.
- Note: the masks will wash easily with water. I recommend you clean them in the sink by simply running water over them. Then just lay them down and let air dry.
Thank you so much for stopping by! I hope you are inspired to make simple handmade cards for friends this week! If you’d like more detailed directions on how to make this card, feel free to email me. Give this papercrafting tutorial a try ? Check back soon for more card making ideas!

Don’t forget to pin this for later!