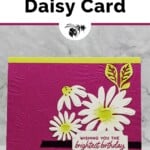
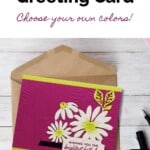
You’re going to love how easy it is to bring your birthday wishes to life with this Cheerful Daisies Birthday Card Tutorial. It uses the Cheerful Daisies Bundle by Stampin’ Up! This versatile Bundle makes it easy to create a blooming handmade masterpiece. Whether you’re all about bold statements or intricate details, this Bundle has you covered.

Opt for the solid images for a dash of simplicity or embrace the open line art for a touch of watercolor wonder. With flowers, centers, leaves, and stems as separate stamps, your daisy creations will be as unique as the person receiving them. And with sentiments for every occasion, from birthdays to heartfelt thanks, you’re set to spread joy and cheer far and wide.
Best of all, the coordinating Dies in this Bundle will help you cut out a garden of happy daisies in seconds! Now, let’s make those birthday greetings unforgettable! Grab your Cheerful Daisies Bundle today and start crafting a world of happiness. Because nothing says “Happy Birthday” quite like a handmade card, blooming with love and care.
How To Make This Card
Project Skill Level: Worker Bee
Worker Bee projects are designed for the crafter who has a bit more time and enjoys creating a handmade card that features a technique or tool. In many cases, a Stampin’ Cut & Emboss Machine is required for die-cutting and/or embossing.
Cardstock Measurements:
- Lemon Lime Twist Cardstock: 5-1/2″ x 8-1/2″, scored at 4-1/4″
- Basic White Cardstock: 4″ x 5-1/4″ (2 pieces)
- Berry Burst Cardstock: 3-3/4″ x 4-1/2″
- Blackberry Bliss Cardstock: 1/4″ x 3-1/2″


Grab your Free copy
Get 5 Bee-utiful Exclusive
Card Sketches in Your Inbox
Join our newsletter and receive a honey of a package of five quick & simple cards guaranteed to make your creativity buzz! Sign up now and let the goodness flow straight to your inbox!
Step-by-Step Instructions:
- Fold the 5-1/2” x 8-1/2” piece of Lemon Lime Twist cardstock in half at the 4-1/4” score line.
- Adhere one of the 4” x 5-1/4” piece of Basic White cardstock inside the card.
- Run the 3-3/4” x 5-1/2” piece of Berry Burst cardstock through the Stampin’ Cut & Emboss Machine using the Fern 3D Folder. Adhere to the front of the card, centering in the middle.
- Run the other piece of 4″ x 5-1/4″ Basic White Cardstock through the Cut & Emboss Machine using the Cheerful Dies in the Bundle. Cut out the 3 daisies die and the sentiment label die.
- Stamp the sentiment onto the die-cut tag using Berry Burst ink. Adhere the 1/4” strip of Blackberry Bliss Cardstock to the back of the tag, angling the left side with scissors and trimming right side as desired. Adhere to the front of the card as shown in the sample.
- Using a Sponge Dauber and the Lemon Lime Twist ink, sponge the center of the 3 daisies and the leaves using the Lemon Lime Twist ink. Adhere to the card front as shown in the sample using adhesive, slightly overlapping the bottom daisies to the tag to finish.
A Tip from Barb
If you don’t have any Sponge Daubers, you can use a clean make-up sponge (be sure to wash it thoroughly in water afterwards) or markers.
If you don’t have the Fern 3D Embossing Folder, you can crumple the Berry Burst cardstock in your hands until well crumpled, then spread out and adhere to the front of the card.
Thanks so much for stopping by today! If you’d like more detailed directions on how to make this card, feel free to email me. Be sure to give this card sketch idea a try and mail it to a friend who is celebrating something! It’s so fun to make a card, but it’s even more fun to send! #makeacardsendacard

Don’t forget to pin this for later!