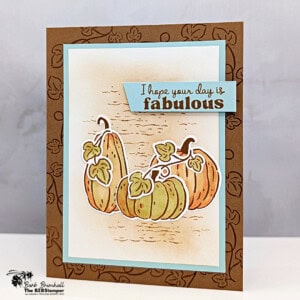
Easy Fall Card Background with Simple Stamping and Ink Blending
You don't need patterned paper or lots of layers to make an interesting fall card. See how simple stamping and ink blending create an easy background for colorful pumpkins.
Supplies Needed
- Pecan Pie Cardstock: 5-1/2" x 8-1/2" (scored at 4-1/4")
- Basic White Cardstock: 4" x 5-1/4" (inside card)
- Pool Party Cardstock: 3-1/2" x 4-3/4"
- Basic White Cardstock: 3-1/4" x 4-1/2"
- Basic White Cardstock: 3" x 4" (for pumpkins/leaves)
- Pool Party Cardstock: 3/4" x 2-1/4" (sentiment)
Instructions
- Fold the Pecan Pie cardstock in half at the 4-1/4" score line to create your card base.
- Adhere the 4" x 5-1/4" piece of Basic White cardstock inside the card and decorate as desired.
- Stamp the small vine around the outside of the card base using Pecan Pie ink.
- Stamp the "dirt" background stamp onto the center of the 3-1/4" x 4-1/2" Basic White cardstock using Pecan Pie ink. Continue until the center of the cardstock is stamped; see sample for placement.
- Ink up a Blending Brush using the Pecan Pie ink pad. Tap off on scratch paper and then softly swirl over the background stamp from the previous step, using a very light hand. Tip: start with a light amount of ink, you can always add more.
- Adhere the White Cardstock to the Pool Party cardstock and then to the front of the card.
- Using the 3" x 4" piece of Basic White cardstock, stamp the trio of pumpkins using Pecan Pie ink. Stamp the leaf vine two times using the same ink pad. Color in all of the images as desired using the Light Old Olive Blend, the Light Timid Tiger Blend, and the Light Golden Glow Blend.
- If you have the Painted Pumpkin Dies, die-cut the pumpkin/leaf images using the Dies with the Stampin' Cut & Emboss Machine. If you do not, fussy cut them out using the Detail Scissors. Adhere all of the images to the card front as shown using adhesive.
- Stamp the sentiment onto the 3/4" strip of Pool Party cardstock using Pecan Pie ink. Cut one end at and angle and adhere the sentiment to the card front using Stampin' Dimensionals to finish.
Notes
Worker Bee (for Confident Cardmakers)
Worker Bee projects are designed for the crafter who has a bit more time and enjoys creating a handmade card that features a technique or tool. In many cases, a Stampin’ Cut & Emboss Machine is required for die-cutting and/or embossing.
Tried this card?Let us know how it turned out!