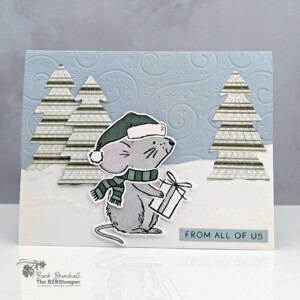
Cute Christmas Card with an Easy Winter Scene
Create a sweet winter scene without complicated techniques. Torn-paper snow, patterned paper trees, and an adorable Christmas mouse come together for a playful handmade card that's easier than it looks.
Supplies Needed
- Cloud Cover Cardstock: 5-1/2" x; 8-1/2" (scored at 4-1/4")
- Basic White Cardstock: 4" x 5-1/4" (inside card)
- A Little Christmas Designer Paper: 3" x 5" (trees; striped pattern)
- Basic White Cardstock: 3" x 5-1/2" (snow)
- Basic White Cardstock: 3-1/2" x 3-1/2" (die-cut mouse)
- Cloud Cover Cardstock: 1/4" x 2" (sentiment)
Instructions
- Lightly fold the Cloud Cover cardstock at the 4-1/4" score line to create your card base.
- Unfold the card and run through the Stampin' Cut & Emboss Machine, using the Swirls of Magic Embossing Folder to emboss the front of the card. Refold the card and burnish well with Bone Folder.
- Using the 3" x 5-1/2" piece of Basic White cardstock, use your thumb to tear the paper in half the long way to create small "hills". Using the WInk of Stella Clear Glitter Brush to add sparkle along both tear lines. Adhere the taller torn piece to the bottom of the card; layer the smaller piece at the bottom. (See sample for placement.)
- Run the A Little Christmas Designer Paper through the Stampin' Cut & Emboss Machine and die-cut 3 of the trees. Adhere to the snowbank as shown in the sample. Tip: I used Stampin' Dimensionals on the 2nd tree from the left to add a bit of dimension; this is totally optional.
- Stamp the mouse, scarf, hat and present onto the 3-1/2" square of Basic White cardstock using Black ink. Color in using the Stampin' Blends. (Tip: I only used the Light Bubble Bath Stampin' Blend for his ear.) Run through the Stampin' Cut & Emboss Machine and die-cut using the corresponding dies from the Christmas Mice Bundle Dies.
- Adhere the hat and scarf to the mouse using adhesive. The present will fit inside the little slit created by the die. Adhere the mouse to the front of the card as shown using Stampin' Dimensionals. Add Wink of Stella as desired to the hat and present.
- Stamp the sentiment onto the 1/4" strip of Cloud Cover cardstock using Peaceful Pine ink. If necessary, trim the edges of the cardstock with scissors. Adhere to the card in the lower right corner to finish.
Notes
Worker Bee (for Confident Cardmakers)
Worker Bee projects are designed for the crafter who has a bit more time and enjoys creating a handmade card that features a technique or tool. In many cases, a Stampin’ Cut & Emboss Machine is required for die-cutting and/or embossing.
Tried this card?Let us know how it turned out!