Spring cards have a special kind of energy. And this fun Spring All Occasion card using the Easter Basket Bundle by Stampin’ Up!® is just that kind of card. It feels fresh, hopeful, and full of possibility. This one leans into that feeling with layered textures, soft color, and playful details that invite you to slow down and enjoy the creative process.
This card works beautifully as a spring card without being tied to a single holiday. While the imagery nods gently to Easter, it’s flexible enough for birthdays, encouragement, thank-you notes, or simply sending something cheerful through the mail. Cards like this help you stretch your supplies and create projects that last beyond one moment on the calendar.

January Bonus
Just a little something extra
Any order you place in January includes a free 10-project tutorial featuring the Made With Love Suite. It’s filled with cozy, step-by-step card ideas to spark your creativity when your order arrives — so you’re not staring at supplies wondering where to start.
This is not a beginner project, and that’s part of what makes it satisfying. However, thanks to the Stampin’ Cut & Emboss Machine, it is an easy one. It’s ideal for a confident stamper who enjoys layering, texture, and thoughtful design choices. If you love projects that feel intentional and a little more involved, this one is a joy to work on.
Even with multiple elements, the design stays grounded. Each layer has a purpose, and the layout keeps everything balanced. This makes the process feel creative rather than overwhelming, especially if you enjoy slowing down and savoring the details.

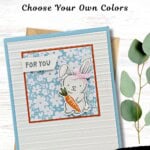
The color combination feels fresh and playful while still being polished. Soft blue paired with warm orange and gentle green gives this card spring energy without feeling juvenile. The striped texture in the background adds depth and structure, while the patterned paper brings movement and interest. The soft pink ribbon finishes the focal image with a subtle, tactile detail that draws the eye without stealing the spotlight..
How To Make This Card
You’ll find the full supply list and step-by-step instructions below.

Spring All Occasion Handmade Card Idea
Supplies Needed
- Balmy Blue Cardstock: 5-1/2" x 8-1/2"
- Basic White Cardstock: 4" x 5-1/4" (2 pieces)
- Pumpkin Pie Cardstock: 2-7/8" x 2-7/8"
- Mixed Up Patterns Paper: 2-3/4" x 2-3/4" (Balmy Blue Floral Pattern)
- Basic White Cardstock: 2-1/2" x 2-1/2" for die-cutting
- Basic White Cardstock: 1/2" x 1-1/2"
Instructions
- Fold the Balmy Blue cardstock in half at the score line to create your card base. Adhere one of the 4" x 5-1/4" pieces of Basic White cardstock inside the card.
- Run the other piece of 4" x 5-1/4" Basic White cardstock through the Stampin' Cut & Emboss Machine using the Lovely Stripes 3D Embossing Folder. Adhere to the front of the card.
- Adhere the Mixed Up Patterns paper to the Pumpkin Pie paper and adhere to the front of the card as shown in the sample.
- Stamp the sentiment onto the 1/2" strip of Basic White cardstock using Smoky Slate ink. Adhere to the top of the Pumpkin Pie/Mixed Up Patterns paper square using Stampin' Dimensionals.
- Using the 2-1/2" square of Basic White cardstock, stamp the bunny in Smoky Slate ink. Squeeze the lid of the Smoky Slate ink pad to transfer ink to the lid of the pad and pick up some ink using the Wink of Stella Glitter Brush, Add light shading to the bunny. Repeat using the Bubble Bath ink pad to color in the bunny ears.
- Carefully ink up just the bottom of the carrot image using Pumpkin Pie ink; ink up the top part of the carrot image using Old Olive ink. Huff on the stamp and stamp onto the Basic White cardstock, leaving room for die-cutting. Squeeze the lid of the closed Pumpkin Pie ink pad to transfer some ink to the lid. Open the pad and using a Blender Pen, color in the carrot. Repeat the process using the Old Olive ink pad and a clean Blender Pen.
- Run the stamped White cardstock through the Cut & Emboss Machine and die-cut the Bunny and the carrot. Adhere the bunny to the bottom right of the Pumpkin Pie/Mixed Up Patterns paper square using Stampin' Dimensionals. Adhere the carrot to the bunny using either adhesive or 2-3 Glue Dots.
- Tie a very small bow using the Bubble Bath Faux Linen Ribbon, trim the edges and adhere to the bunny using a Glue Dot to finish.
Notes
Worker Bee projects are designed for the crafter who has a bit more time and enjoys creating a handmade card that features a technique or tool. In many cases, a Stampin’ Cut & Emboss Machine is required for die-cutting and/or embossing.
Once finished, this card feels substantial and complete. You can see the time and care that went into it, and that makes it especially rewarding to send. It’s the kind of project that reminds you why you enjoy cardmaking in the first place.
Sending a handmade card like this is about sharing more than paper and ink. It’s about offering encouragement, warmth, and connection. Spring cards carry a hopeful message, and mailing one is a simple way to brighten someone’s season and stay connected in a meaningful way.
Love this color combo? Pin it for later!

Supplies Used:


Price: $12.50


One more little perk while you’re shopping. Each month there’s a Product of the Month you can add for just $5 when your order reaches $75. It’s a fun surprise that’s not in the catalog and only available while supplies last. Click To Learn More
If you enjoy simple, cozy cardmaking like this, you’d love the creative support we share inside the Creative Living Room. If you have questions about today’s tutorial, please email me for detailed steps. Inspire your craft with more ideas—join me over on Pinterest!


Grab your Free copy
Get 5 Bee-utiful Exclusive
Card Sketches in Your Inbox
Join our newsletter and receive a honey of a package of five quick & simple cards guaranteed to make your creativity buzz! Sign up now and let the goodness flow straight to your inbox!