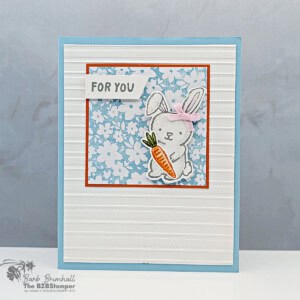
Spring All Occasion Handmade Card Idea
This spring all-occasion handmade card uses layered textures, thoughtful color choices, and detailed elements to create a polished design that works beyond Easter. Perfect for confident stampers, it’s a beautiful way to send cheerful springtime happy mail.
Supplies Needed
- Balmy Blue Cardstock: 5-1/2" x 8-1/2"
- Basic White Cardstock: 4" x 5-1/4" (2 pieces)
- Pumpkin Pie Cardstock: 2-7/8" x 2-7/8"
- Mixed Up Patterns Paper: 2-3/4" x 2-3/4" (Balmy Blue Floral Pattern)
- Basic White Cardstock: 2-1/2" x 2-1/2" for die-cutting
- Basic White Cardstock: 1/2" x 1-1/2"
Instructions
- Fold the Balmy Blue cardstock in half at the score line to create your card base. Adhere one of the 4" x 5-1/4" pieces of Basic White cardstock inside the card.
- Run the other piece of 4" x 5-1/4" Basic White cardstock through the Stampin' Cut & Emboss Machine using the Lovely Stripes 3D Embossing Folder. Adhere to the front of the card.
- Adhere the Mixed Up Patterns paper to the Pumpkin Pie paper and adhere to the front of the card as shown in the sample.
- Stamp the sentiment onto the 1/2" strip of Basic White cardstock using Smoky Slate ink. Adhere to the top of the Pumpkin Pie/Mixed Up Patterns paper square using Stampin' Dimensionals.
- Using the 2-1/2" square of Basic White cardstock, stamp the bunny in Smoky Slate ink. Squeeze the lid of the Smoky Slate ink pad to transfer ink to the lid of the pad and pick up some ink using the Wink of Stella Glitter Brush, Add light shading to the bunny. Repeat using the Bubble Bath ink pad to color in the bunny ears.
- Carefully ink up just the bottom of the carrot image using Pumpkin Pie ink; ink up the top part of the carrot image using Old Olive ink. Huff on the stamp and stamp onto the Basic White cardstock, leaving room for die-cutting. Squeeze the lid of the closed Pumpkin Pie ink pad to transfer some ink to the lid. Open the pad and using a Blender Pen, color in the carrot. Repeat the process using the Old Olive ink pad and a clean Blender Pen.
- Run the stamped White cardstock through the Cut & Emboss Machine and die-cut the Bunny and the carrot. Adhere the bunny to the bottom right of the Pumpkin Pie/Mixed Up Patterns paper square using Stampin' Dimensionals. Adhere the carrot to the bunny using either adhesive or 2-3 Glue Dots.
- Tie a very small bow using the Bubble Bath Faux Linen Ribbon, trim the edges and adhere to the bunny using a Glue Dot to finish.
Notes
Worker Bee (for Confident Cardmakers)
Worker Bee projects are designed for the crafter who has a bit more time and enjoys creating a handmade card that features a technique or tool. In many cases, a Stampin’ Cut & Emboss Machine is required for die-cutting and/or embossing.
Worker Bee projects are designed for the crafter who has a bit more time and enjoys creating a handmade card that features a technique or tool. In many cases, a Stampin’ Cut & Emboss Machine is required for die-cutting and/or embossing.
Tried this card?Let us know how it turned out!