Create this cute Holiday Card Using the Jolly Delivery Stamps by Stampin’ Up!® This handmade card is the kind of project that instantly makes you smile. With its adorable wolf (who looks like a pup!) balancing a stack of gifts, it captures the playful magic of the season without any fuss. Whether you’re brand new to cardmaking or just looking for an easy holiday project, this design shows how simple supplies and a few coordinating colors can come together to make something truly heartwarming.

If you’ve ever wanted to make a handmade card that feels festive without being fussy, this one’s for you. The Jolly Delivery Stamp Set by Stampin’ Up!® is packed with personality — from cheerful delivery animals to charming sentiments that make you think of happy mail and cozy holiday moments. I paired the playful pup (or wolf) image with subtle background texture using the Cloud Cover Designer Paper, which adds a soft, wintry feel without stealing the spotlight.
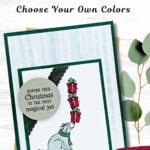
To keep the focus on the stamped image, I used a classic Christmas color combination of Shaded Spruce, Real Red, and Gray Granite. These shades work beautifully together — the deep green adds richness, the red brings that traditional holiday pop, and the warm gray grounds everything with a touch of elegance. If you love timeless Christmas colors with a modern twist, this combo is a winner!

A strip of our Shaded Spruce & Soft Sea Foam ribbon adds a little extra texture and ties everything together. (Literally!) I also used the 1-3/4″ Circle Punch to cut out the sentiment — such a simple way to give it a finished, professional look. And of course, I colored the image with Stampin’ Blends for that smooth, blended finish that makes the little dog (or wolf) come alive. It’s amazing how a few minutes of coloring can transform a stamped image into something that feels truly special.
What I love most about this card is how easy it is to adapt. Swap the pup/wolf for the bear or cat image from the same stamp set, and you’ve got an entirely new design with the same cheerful spirit. You could even switch up the colors to match your holiday décor or gift wrap theme. Imagine these cards tucked into packages, tied onto treats, or mailed to friends — it’s a surefire way to spread smiles.


Grab your Free copy
Get 5 Bee-utiful Exclusive
Card Sketches in Your Inbox
Join our newsletter and receive a honey of a package of five quick & simple cards guaranteed to make your creativity buzz! Sign up now and let the goodness flow straight to your inbox!
If you’re a newer stamper, this project is a great example of how layering your cardstock and keeping a clean layout can instantly elevate your card without adding extra steps. The pop of color from the presents, the gentle stripes in the background, and the rounded sentiment circle make this design feel polished but still playful. It’s a reminder that handmade doesn’t have to mean complicated.
So grab your Jolly Delivery Stamp Set, a few of your favorite blends, and your go-to adhesive — you’ll be amazed at how quickly this little cutie comes together. In just a few minutes, you’ll have a Christmas card that’s equal parts sweet, simple, and smile-inducing.
If you enjoyed this project, make sure to check out my full tutorial where I share all the measurements and step-by-step instructions. You can pin this card for later, or better yet, make a few while the holiday music plays in the background. However you create it, this card will make your recipient’s day — and probably yours too.
Don’t forget to pin this for later!

I appreciate you dropping by! My mission is to inspire you with card tutorials that are as fun to make as they are to give. If you’re curious about the specifics of crafting today’s design, just send me an email. Want more papercrafting ideas? Join my Facebook Community today.


Jolly Delivery Christmas Card That’s Full of Cheer
Supplies Needed
- Shaded Spruce Cardstock: 5-1/2" x 8-1/2" Scored at 4-1/4"
- Basic White Cardstock: 4" x 5-1/4"
- In Color Designer Paper (Cloud Cover): 4" x 5-1/4"
- Shaded Spruce Cardstock: 3-1/4" x 3-3/4"
- Basic White Cardstock: 3" x 3-1/2"
- Gray Granite Cardstock: 2-1/4" x 2-1/4" (scrap for punching)
Instructions
- Fold the Shaded Spruce cardstock in half at the score line to create your card base.
- Adhere the 4" x 5-1/4" piece of Basic White cardstock to the inside of the card.
- Adhere the 4' x 5-1/4" piece of Cloud Cover Designer Series Paper to the front of the card.
- Using the 3" x 3-1/2" piece of Basic White cardstock, stamp the pup/wolf image towards the bottom of the cardstock using Tuxedo Black Memento Ink. See sample for placement.
- Using the same Black ink pad, stamp the present onto the top of the pup/wolf nose. Reink the stamp and stamp again on top of the first package. Repeat one more time.
- Color in the presents using the Dark Real Red Stampin' Blend and the Light Shaded Spruce Stampin' Blend. Color in the pup/wolf using the Cloud Cover Stampin' Blends and the Dark Shaded Spruce Stampin' Blend for his scarf.
- Cut 5" of the Shaded Spruce & Soft Sea Foam Ribbon and place in the upper left corner of the Basic White cardstock; tape the ends to the back of the cardstock. Adhere the Basic White cardstock to the 3-1/4" x 3-3/4" piece of Shaded Spruce cardstock and adhere to the card in the lower left corner of the card base.
- Stamp the sentiment onto the Gray Granite cardstock using Shaded Spruce ink. Punch out the sentiment using the 1-3/4" Circle Punch and adhere onto the card (see sample for placement) using Stampin' Dimensionals.
- To finish, add Wink of Stella to the presents as desired.
Notes
Busy Bee projects are designed for the beginner or busy papercrafter. This is a basic cardmaking project that can be achieved by someone who has never made a handmade card before. You can view more Busy Bee cards here.
Supplies Used On This Project:


Price: $12.50