Jolly Delivery Christmas Card That’s Full of Cheer
This Cute Holiday Card Using the Jolly Delivery Stamps is a quick, charming Christmas project that’s perfect for beginners. Featuring a playful pup, cheerful colors, and easy layers, it’s the kind of handmade card that spreads instant holiday joy.
Supplies Needed
- Shaded Spruce Cardstock: 5-1/2" x 8-1/2" Scored at 4-1/4"
- Basic White Cardstock: 4" x 5-1/4"
- In Color Designer Paper (Cloud Cover): 4" x 5-1/4"
- Shaded Spruce Cardstock: 3-1/4" x 3-3/4"
- Basic White Cardstock: 3" x 3-1/2"
- Gray Granite Cardstock: 2-1/4" x 2-1/4" (scrap for punching)
Instructions
- Fold the Shaded Spruce cardstock in half at the score line to create your card base.
- Adhere the 4" x 5-1/4" piece of Basic White cardstock to the inside of the card.
- Adhere the 4' x 5-1/4" piece of Cloud Cover Designer Series Paper to the front of the card.
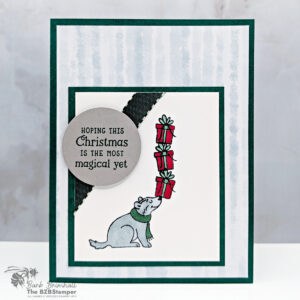
- Using the 3" x 3-1/2" piece of Basic White cardstock, stamp the pup/wolf image towards the bottom of the cardstock using Tuxedo Black Memento Ink. See sample for placement.
- Using the same Black ink pad, stamp the present onto the top of the pup/wolf nose. Reink the stamp and stamp again on top of the first package. Repeat one more time.
- Color in the presents using the Dark Real Red Stampin' Blend and the Light Shaded Spruce Stampin' Blend. Color in the pup/wolf using the Cloud Cover Stampin' Blends and the Dark Shaded Spruce Stampin' Blend for his scarf.
- Cut 5" of the Shaded Spruce & Soft Sea Foam Ribbon and place in the upper left corner of the Basic White cardstock; tape the ends to the back of the cardstock. Adhere the Basic White cardstock to the 3-1/4" x 3-3/4" piece of Shaded Spruce cardstock and adhere to the card in the lower left corner of the card base.
- Stamp the sentiment onto the Gray Granite cardstock using Shaded Spruce ink. Punch out the sentiment using the 1-3/4" Circle Punch and adhere onto the card (see sample for placement) using Stampin' Dimensionals.
- To finish, add Wink of Stella to the presents as desired.
Notes
Busy Bee (for Beginner or Busy Cardmakers)
Busy Bee projects are designed for the beginner or busy papercrafter. This is a basic cardmaking project that can be achieved by someone who has never made a handmade card before. You can view more Busy Bee cards here.
Busy Bee projects are designed for the beginner or busy papercrafter. This is a basic cardmaking project that can be achieved by someone who has never made a handmade card before. You can view more Busy Bee cards here.
Tried this card?Let us know how it turned out!