If you want a project that feels cute without being complicated, this adorable card using the Valentine Kisses Bundle is such a fun one to put together. There’s a sweet little bear, a tiny kissing booth, and enough charming details to make this card feel playful without being fussy. It’s simple to make, easy to personalize, and perfect for those moments when you want to create something heartfelt without spending your whole afternoon crafting.
This bundle has such a lighthearted feel to it. The line-art images are easy to color, even if coloring isn’t your favorite part of cardmaking. The dies help you build the kissing booth without any guesswork, so you get a polished focal point every single time. And honestly, once that little bear is peeking out from behind the booth, the whole card comes alive. It’s one of those projects where you can’t help but smile as the pieces come together.
Something I love about this design is how stress-free the process is. You don’t need fancy techniques or special tools. You just stamp, color quickly with our Stampin’ Blends, die-cut, and layer. That’s it. Even the scene-building feels effortless because the bundle does the heavy lifting for you. If you’ve ever sat down to craft and felt overwhelmed before you even reached for the ink, this kind of card is a nice reset. It lets you enjoy the making without getting stuck in perfection mode.


Grab your Free copy
Get 5 Bee-utiful Exclusive
Card Sketches in Your Inbox
Join our newsletter and receive a honey of a package of five quick & simple cards guaranteed to make your creativity buzz! Sign up now and let the goodness flow straight to your inbox!
And let’s talk about color!
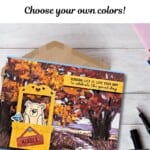
The color combo adds so much charm to the finished card. Azure Afternoon brings in a bright, happy pop of blue. Timid Tiger adds warmth without being too bold. Cajun Craze grounds everything and gives the whole scene a cozy feeling. Together, the colors balance out the sweetness of the bears so the card feels fun and cheerful, not overly Valentine-heavy. It’s a great palette for a card you can send any time of year.

And let’s be honest: cute critter cards never go out of style. Whether you’re sending this to a partner, a friend, a grandchild, or someone who simply needs a little encouragement, a sweet handmade scene like this has a way of landing right in the heart. It’s personal, it’s warm, and it feels like something made with intention.
If you love cards that look sweet without being complicated, this bundle is for you. It gives you the structure you need to make something adorable, while still letting you get creative with the details. Whether you follow this layout exactly or build a totally new scene, you’ll have a fun time crafting and a cute card ready to send.
If you’d like to try this project, make sure to save it for later or share it with a crafty friend. And if you make your own version, I’d love to see how yours turns out.
Don’t forget to pin this for later!

I’m delighted you stopped by for today’s creative escape! Whether it’s a birthday, holiday, or any special moment, I’m here to help you craft the perfect card with ease. If you have questions about today’s tutorial, please email me for detailed steps. Inspire your craft with more ideas—join me over on Pinterest!


Send A Card That Brightens Someone’s Day
Supplies Needed
- Azure Afternoon Cardstock: 5-1/2" x 8-1/2" Scored at 4-1/4"
- Basic White Cardstock: 4" x 5-1/4" (for inside of card)
- Splendid Autumn Designer Paper: 4" x 5-1/2" (tree pattern)
- Splendid Autumn Designer Paper: 3" x 6" (Wild Wheat)
- Splendid Autumn Designer Paper: 1" x 2" (Cajun Craze for sign)
- Basic White Cardstock: 3" x 5-1/2" (for die-cutting)
Instructions
- Fold the Azure Afternoon cardstock in half at the score line to create your card base.
- Adhere the 4" x 5-1/4" piece of Basic White cardstock inside the card base. Optional: stamp the "Happy Valentine's Day" sentiment inside the card using Black Memento Ink.
- Adhere the 4" x 5-1/2" piece of Splendid Autumn Designer Series Paper to the front of the card base.
- Using your Paper Trimmer, trim off 1/2" from the shorter (3") end of the 3" x 6" piece of Wild Wheat Splendid Autumn paper so that it measures 1/2" x 3". Using Black Memento ink pad, stamp the "sending lots of love" sentiment onto the 1/2" strip. If desired, trim both ends using scissors or your Trimmer. Adhere to the top right of the card, as shown in the sample, using Stampin' Dimensionals.
- Run the remaining piece of the Wild Wheat Splendid Autumn paper through the Stampin' Cut & Emboss Machine and die-cut the "short" bear image, the "booth" images, and 4 of the small bird die-cuts using the Bundle Dies.
- Color in the Bear using the Ivory Blend, the birds using the Light Azure Afternoon Blend, and the bird beaks using the Dark Timid Tiger Blend. Assemble the kissing booth, then adhere the bear to the back of the kissing booth so he shows through. Adhere one of the birds to the kissing booth as shown in the sample. Adhere the booth to the card using Stampin' Dimensionals. Adhere the other bird to the lower right of the card (see sample for placement.)
- Carefully ink up the "kisses" sentiment using the corner of the Memento Ink Pad and stamp onto the Cajun Craze Splendid Autumn paper. You can also handwrite the kissses sentiment onto the sign after you die-cut it out. Run the paper through the Cut & Emboss Machine and die-cut using the Sign Die from the Bundle.
- Adhere the sign to the kissing booth using adhesive; add one of the Azure Afternoon Rainbow Dots as a "hanger" for the sign.
Notes
Worker Bee projects are designed for the crafter who has a bit more time and enjoys creating a handmade card that features a technique or tool. In many cases, a Stampin’ Cut & Emboss Machine is required for die-cutting and/or embossing.