Some days, you just want to sit down and make something sweet, simple, and heartfelt—and that’s exactly what today’s card delivers. This Just a Note with the Notes and Totes Stamp Set by Stampin’ Up!® is an all-occasion handmade card designed for those quiet moments when you want to send a little love or encouragement without overthinking your supplies or your layout.

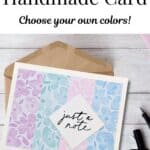
This card is built with beginners in mind, but honestly? It feels special no matter your experience level. The layout is clean, the colors are calming, and the message is one anyone would love to find in their mailbox. I used strips from the Subtles 6″ x 6″ Designer Series Paper pack, featuring florals and artistic washes in some of Stampin’ Up!’s softest and most soothing shades—Bubble Bath, Balmy Blue, Pool Party, and Fresh Freesia are the stars here.

To keep the focus on the sentiment, I stamped “just a note” from the Notes & Totes Stamp Set onto a crisp white stitched diamond. I love how the relaxed script contrasts beautifully with the bold geometric placement. A few tiny dot clusters from the stamp set add a little visual texture behind the words—almost like tiny sprinkles of happy.
And while I didn’t use the coordinating Notes & Totes Dies for this project, I can’t help but imagine how cute this layout would be paired with the tote bag dies for a next-level version. Those dies let you build a 3D tote with pockets, handles, a water bottle, and even a tiny magazine! You could easily step this card up for a gift bag tag, mini album accent, or scrapbook journaling pocket. The possibilities go way beyond cards, and that’s what makes this bundle such a standout for summer crafting.
So whether you’re brand new to stamping or just craving a low-stress project, this card delivers. It’s soft, sweet, and oh-so-makeable.
Want to give it a try? I’ve got all the measurements and a step-by-step tutorial linked below so you can recreate this exact card or use it as a jumping-off point for your own pastel-perfect creations.
How To Make This Card
Project Skill Level: Busy Bee
Busy Bee projects are designed for the beginner or busy papercrafter. This is a basic cardmaking project that can be achieved by someone who has never made a handmade card before. You can view more Busy Bee cards here.
Cardstock Measurements:
- Basic White Cardstock: 5-1/2″ x 8-1/2″, scored at 4-1/4″
- Subtles 6″ x 6″ Designer Series Paper: 1-1/4″ x 3-3/4″, 1 each of
Fresh Freesia, Pool Party, Bubble Bath, and Balmy Blue papers - Basic White Cardstock: 2″ x 2″


Grab your Free copy
Get 5 Bee-utiful Exclusive
Card Sketches in Your Inbox
Join our newsletter and receive a honey of a package of five quick & simple cards guaranteed to make your creativity buzz! Sign up now and let the goodness flow straight to your inbox!
Step-by-Step Instructions:
- Fold the Basic White Cardstock in half at the score line to create your card base.
- Adhere the 4 pieces of Subtles Designer Paper to the front of the card as shown in the sample.
- Using the 2″ square of Basic White cardstock, turn 90 degrees so that it looks like a diamond and stamp the sentiment using the Black Memento ink.
- Using the Bubble Bath ink pad, stamp the speckle stamp over the top of the sentiment.
- Adhere the sentiment to the front of the card using Stampin’ Dimensionals to finish.
A Tip from Barb
This is the perfect card sketch for whenever you have some pretty paper you’d like to use! Just grab 2-3 colors from the paper you want to use and pull your coordinating cardstock, inks and any embellishments you’d like! An easy peasy card without any stress – I love when my pretty paper can do the heavy lifting on my cards!?
Note: On this card, I used the Stylish Shapes Dies to create the sentiment label; if you’d prefer to have the stitching, you’ll need those Dies and the Cut & Emboss Machine.
Thanks for stopping by for today’s card tutorial!
My goal is to help you make quick & easy greeting cards for all occasions. If you’d like more detailed directions on how to make this card, feel free to email me. I hope you’ll join me again for more card-making ideas!

Don’t forget to pin this for later!