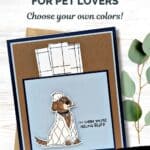
This simple card using the Hugs and Healing Stamp Set by Stampin’ Up!® is a great project for beginner stampers who want to send a comforting message without feeling overwhelmed by techniques or supplies. This sweet pup in a comforting blanket makes a perfect focal point, and the simple layout lets the stamped image shine while giving just enough detail to make the card feel polished and thoughtful.

This card came together quickly, but it still feels personal and heartfelt—exactly the kind of card you want to have on hand for a friend who’s feeling a little under the weather. I started with a base of Night of Navy cardstock, which gave the entire design a strong foundation and made the lighter elements really pop.
For the next layer, I added mats of soft Cloud Cover (a new 2025-2027 In Color) and Pecan Pie cardstock, which frames the main image beautifully. To add interest without complicating the layout, I used strips of Lovely Garden Designer Series Paper behind the focal panel. The clean black-and-white lines of this pretty paper brought just enough contrast without pulling attention away from the dog.
Speaking of that adorable pup—he’s stamped and colored using Stampin’ Blends, which are great for beginners who want to achieve smooth, vibrant color with very little effort. And finally, I added Sparkle Gems to mimic a cozy little brooch dog tag. It’s a tiny detail, but it gives the card a little extra charm.
The sentiment “I’m sorry you’re feeling ruff” is one of my favorites from this set. It’s light-hearted, punny, and just the right tone for a feel-better card. Whether your recipient is sick, stressed, or just having a tough day, this card lets them know they’re seen—and hopefully brings a small smile.
If you’ve been looking for a beginner-level card that still feels elevated and heartfelt, this design is a great place to start. You only need a handful of products and about 15–20 minutes to pull it together. And best of all? You can easily swap the Designer Paper and colors to suit the personality of your recipient.
The Hugs and Healing Stamp Set continues to be one of my go-tos when I want to craft with heart. It’s perfect for simple cards that say a lot—and that’s exactly what today’s card is all about.
How To Make This Card
Project Skill Level: Busy Bee
Busy Bee projects are designed for the beginner or busy papercrafter. This is a basic cardmaking project that can be achieved by someone who has never made a handmade card before. You can view more Busy Bee cards here.
Cardstock Measurements:
- Night of Navy Cardstock: 5-1/2″ x 8-1/2″, scored at 4-1/4″
- Basic White Cardstock: 4″ x 5-1/4″
- Cloud Cover Cardstock: 4″ x 5-1/4″
- Pecan Pie Cardstock: 3-7/8″ x 5-1/8″
- Lovely Garden Designer Series Paper: 3/4″ x 4-1/2″ (3 pieces)
- Night of Navy Cardstock: 3-3/8″ x 3-1/8″
- Cloud Cover Cardstock: 3-1/4″ x 3″
- Basic White Cardstock: scrap (2-1/2″ x 2-3/4″)
- Lovely Garden Designer Series Paper: scrap (2″ x 2″)


Grab your Free copy
Get 5 Bee-utiful Exclusive
Card Sketches in Your Inbox
Join our newsletter and receive a honey of a package of five quick & simple cards guaranteed to make your creativity buzz! Sign up now and let the goodness flow straight to your inbox!
Step-by-Step Instructions:
- Fold the Night of Navy Cardstock in half at the score line to create your card base.
- Adhere the 4″ x 5-1/4″ piece of Basic White cardstock inside the card.
- Adhere the Pecan Pie cardstock to the 4″ x 5-1/4″ piece of Cloud Cover Cardstock.
- Adhere the 3 pieces of Lovely Garden Designer Paper to the center of the Pecan Pie cardstock, angling and varying the height of all 3 pieces. (See sample for placement.)
- Stamp the sentiment on the lower right side of the 3-1/4″ x 3″ Cloud Cover Cardstock using Black Memento ink. Adhere the Cloud Cover cardstock to the 3-3/8″ x 3-1/8″ piece of Night of Navy cardstock. Adhere to the center of the card.
- Using the Scrap of Basic White cardstock, stamp the dog using Black Memento ink. Color in using the Ivory & Bronze Blends, and the Basic Black Marker for his collar & nose.
- Stamp the dog image again onto the scrap of Lovely Garden paper using the Black Memento ink. Fussy cut out only the blanket and glue onto the dog image from previous step. (This technique is called paper-piecing.)
- Add the dog image to the card, just left of the sentiment, using Stampin’ Dimensionals.
- To finish, add 1 small rhinestone to his collar to finish.
Thanks for stopping by for today’s card tutorial! My goal is to help you make quick & easy greeting cards for all occasions. If you’d like more detailed directions on how to make this card, feel free to email me. I hope you’ll join me again for more card-making ideas!

Don’t forget to pin this for later!