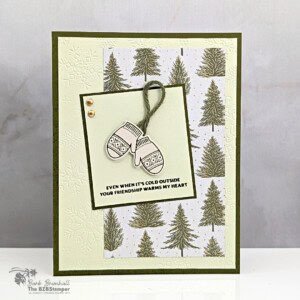
Winter Friendship Card with the Dreamy Snowflakes Bundle
Make a thoughtful winter friendship card using the Dreamy Snowflakes Bundle, soft green colors, embossed snowflakes, and a sweet mitten design. Includes a free tutorial!
Supplies Needed
- Mossy Meadow Cardstock: 8-1/2" x 5-1/2" (scored at 4-1/4")
- Basic Beige Cardstock: 4" x 5-1/4"
- Soft Sea Foam Cardstock: 4" x 5-1/4"
- Neutral Noel Specialty Paper: 2-3/4" x 4-3/4"
- Mossy Meadow Cardstock: 2-3/8" X 2-5/8"
- Soft Sea Foam Cardstock: 2-1/4" X 2-1/2"
- Basic Beige Cardstock: 2" x 2" (scrap for die-cutting)
Instructions
- Fold the Mossy Meadow cardstock in half at the score line to create your card bass. Adhere the 4" x 5-1/4" Basic Beige cardstock inside the card and decorate as desired.
- Run the 4" x 5-1/4" Soft Sea Foam cardstock through the Stampin' Cut & Emboss Machine using the Dreamy Snowflakes Hybrid Embossing Folder. Adhere to the front of the card. Note: I used the depressed (back side) of the embossed cardstock)
- Adhere the Neutral Noel Specialty Paper to the front of the card as shown in the sample.
- Stamp the sentiment at the bottom of the 2-1/4" X 2-1/2" Soft Sea Foam cardstock using Mossy Meadow ink. Adhere to the Mossy Meadow cardstock and adhere this to the front of the card at a slight angle. See sample for placement.
- Stamp the mittens image onto the scrap of Basic Beige cardstock using Mossy Meadow ink. Run through the Stampin' Cut & Emboss Machine and die-cut using the Dreamy Snowflakes Mitten Die. Cut 3" of the Mossy Meadow Jute and adhere each end to the back of each mitten using a Stampin' Dimensional. Adhere the mittens just above the sentiment.
- To finish, add the Gold Adhesive-Backed Dots as desired.
Notes
Worker Bee (for Confident Cardmakers)
Worker Bee projects are designed for the crafter who has a bit more time and enjoys creating a handmade card that features a technique or tool. In many cases, a Stampin’ Cut & Emboss Machine is required for die-cutting and/or embossing.
Tried this card?Let us know how it turned out!