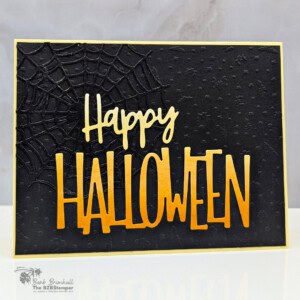
Spooky Halloween Cards with the Web of Fun Dies
Create a striking Halloween card with the Web of Fun Dies and Seasonal Cheer Mini Embossing Folders. This elegant design combines dramatic textures, layered die cuts, and a classic Halloween color palette for a card that's both spooky and sophisticated.
Supplies Needed
- Lemon Lolly Cardstock: 5-1/2" x 8-1/2" (scored at 4-1/4")
- Basic White Cardstock: 4" x 5-1/4" (inside card)
- Basic Black Cardstock: 4-1/8" x 5-3/8"
- Basic Black Cardstock: 4" x 4" (for die-cutting)
- Basic White Cardstock: 3-1/2" x 4-1/2" (for die-cutting)
Instructions
- Fold the Lemon Lolly cardstock in half at the score line to create your card base.
- Adhere the 4" x 5-1/4" piece of Basic White cardstock inside the card and decorate as desired.
- Run the 4-1/8" x 5-3/8" piece of Basic Black cardstock through the Stampin' Cut & Emboss Machine using the Halloween Seasonal Cheer Mini Embossing Folder. You'll need to emboss on the left side, then run through again and emboss on the right side.
- Run the 4" x 4" piece of Basic Black cardstock through the Stampin' Cut & Emboss Machine and die-cut the large web. Apply Wink of Stella to the entire web and then adhere to the top left corner of the Black Cardstock from the previous step. Trim off any part of the web that hangs over using scissors; adhere to the front of the card.
- Place the 3-1/2" x 4-1/2" piece of Basic White cardstock with the cardstock in landscape orientation on scrap paper. Using a Blending Brush, start by sponging Crushed Curry ink lightly at the top of the cardstock and continue two-thirds of the way down the cardstock, sponging progressively darker by adding more ink. On the bottom third of the cardstock, sponge Pumpkin Pie ink, adding the most ink at the bottom of the cardstock to create an ombre effect.
- Line up the "happy" and "halloween" dies on the Basic White cardstock so that the "happy" is in the yellow ombre area and the "Halloween" is in the orange ombre area. Run through the Stampin' Cut & Emboss Machine to die-cut.
- Adhere the die-cuts onto the card front as shown in the sample to finish.
Notes
Worker Bee (for Confident Cardmakers)
Worker Bee projects are designed for the crafter who has a bit more time and enjoys creating a handmade card that features a technique or tool. In many cases, a Stampin’ Cut & Emboss Machine is required for die-cutting and/or embossing.
Tried this card?Let us know how it turned out!