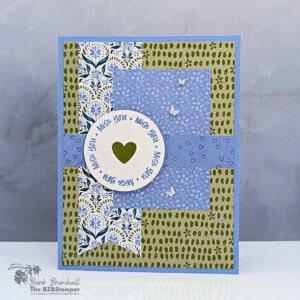
How to Mix Patterned Papers on a Handmade Card
Wondering how to mix patterned papers without making your card look too busy? This handmade “Miss You” card features Mosaic Garden Designer Series Paper, the Round About Messages Stamp Set, and a simple layout you can use for almost any occasion.
Supplies Needed
- Hydrangea Hue Cardstock: 8-1/2" x 5-1/2" (score at 4-1/4")
- Basic White Cardstock: 4" x 5-1/4" (inside card)
- Mosaic Garden Designer Paper: 4" x 5-1/4"
- Mosaic Garden Designer Paper: 1-1/2" 5"
- Mosaic Garden Designer Paper: 2-1/4" x 3-1/4"
- Hydrangea Hue Cardstock: 4" x 3/4"
- Basic White Cardstock: 2-1/2" x 1-1/2" (or scrap for punching sentiment)
Instructions
- Fold the 8 1/2” x 5 1/2” Hydrangea Hue cardstock in half at the scoreline to create card base.
- Adhere the 4” x 5 1/4” cardstock inside the card base and decorate as desired.
- Adhere the 4” x 5 1/4” Mosaic Garden Paper to the front of the card.
- Using scissors, banner notch the bottom of the 1 1/2” x 5” Mosaic Garden Paper; adhere to front of the card as shown on the sample.
- Adhere the 2 1/4” x 3 1/4” Mosaic Garden Paper to the front of the card as shown on sample.
- Stamp the small hearts randomly on the 3/4” strip of Hydrangea Hue cardstock using Hydrangea Hue ink. Adhere to card front.
- Stamp the circle stamp onto the 2 1/2” square of Basic White cardstock using Hydrangea Hue ink. Stamp the heart inside the circle using Old Olive ink. Punch out the circle using the 1-7/8” Circle Punch and adhere to the card front using Stampin’ Dimensionals.
- Add the In Color Butterflies embellishments as desired to finish.
Notes
Busy Bee (for Beginner or Busy Cardmakers)
Busy Bee projects are designed for the beginner or busy papercrafter. This is a basic cardmaking project that can be achieved by someone who has never made a handmade card before. You can view more Busy Bee cards here.
Tried this card?Let us know how it turned out!