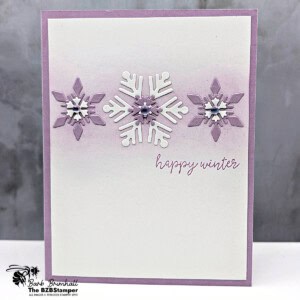
Happy Winter Card with the Snowflake Kisses Bundle
Soft colors, layered snowflake dies, and frosted accents make this Happy Winter Card shine. Using the Snowflake Kisses Bundle, you’ll create a cozy handmade card that’s simple to make and full of winter charm.
Supplies Needed
- Fresh Freesia Cardstock: 5-1/2" x 8-1/2", scored at 4-1/4"
- Basic White Cardstock: 4" x 5-1/4" (2 pieces)
- Fresh Freesia Cardstock: Scrap (2" x 5-1/2") for die-cutting
- Basic White Cardstock: Scrap (2" x 5-1/2") for die-cutting
Instructions
- Fold the Fresh Freesia Cardstock in half at the score line to create your card base. Adhere one of the 4" x 5-1/4" pieces of Basic White Cardstock inside the card.
- Run the scraps of Basic White and Fresh Freesia cardstock through the Stampin' Cut & Emboss Machine. Using the Snowflake Kisses Dies, cut out the 3 Fresh Freesia and 3 Basic White snowflakes as shown in the sample.
- Ink up a Blending Brush using Fresh Freesia ink. Tap off some of the ink on your scratch sheet and then lightly blend an approximately 1-1/2" wide swatch of ink across the other 4" x 5-1/4" piece of Basic White Cardstock, about 1-1/2" down from the top.
- Adhere the die-cut Snowflakes from Step #2 over the sponged area as shown in the sample.
- Stamp the sentiment under the snowflakes on the right side. Adhere the Basic White cardstock to the front of the card.
- To finish, add a Frosted Iridescent Dot to the center of all 3 of the snowflakes.
Notes
Worker Bee (for Confident Cardmakers)
Worker Bee projects are designed for the crafter who has a bit more time and enjoys creating a handmade card that features a technique or tool. In many cases, a Stampin’ Cut & Emboss Machine is required for die-cutting and/or embossing.
Worker Bee projects are designed for the crafter who has a bit more time and enjoys creating a handmade card that features a technique or tool. In many cases, a Stampin’ Cut & Emboss Machine is required for die-cutting and/or embossing.
Tried this card?Let us know how it turned out!