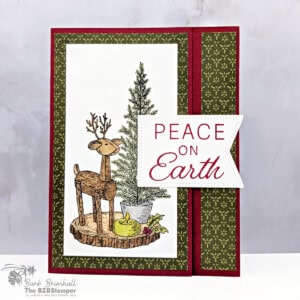
Handmade Rustic Card featuring the Rustic Centerpiece Stamp Set
This handmade holiday card features a rustic woodland design using the Rustic Centerpiece Stamp Set. With warm coloring, layered textures, and a cozy layout, it’s the perfect project to add a personal touch to your Christmas cardmaking this season.
Supplies Needed
- Cherry Cobbler Cardstock: 5-1/2" x 7-1/2", scored at 3-1/4" (fun fold)
- Basic White Cardstock: 2-3/4" x 5-1/4" (inside card)
- Painterly Pears Designer Series Paper: 3/4" x 5-1/4" (inside panel)
- Painterly Pears Deisgner Series Paper: 3" x 5-1/4" (outside panel)
- Basic White Cardstock: 2-1/2" x 4-3/4"
- Basic White Cardstock: 1-5/8" x 2-3/8" (sentiment)
Instructions
- Fold the Cherry Cobbler cardstock at the 3-1/4" score line to create your card base.
- Adhere the 3/4" strip of Painterly Pears Designer Paper to the inside left of the card base.
- Adhere the 2-3/4" x 5-1/4" piece of Basic White cardstock on the inside left of the card base.
- Using the 2-1/2" x 4-3/4" piece of Basic White cardstock, stamp the focal image using Tuxedo Black Memento ink. Color in the image using the Pecan Pie Blends, the Old Olive Blends, the Dark Cherry Cobbler Blend, the Dark Daffodil Delight Blend, and the Dark Gray Granite Blend. Optional: use the Color Lifter to remove some of the color where needed to create more shading.
- Adhere the 2-1/2" x 4-3/4" piece of Basic White cardstock onto the 3" x 5-1/4" piece of Painterly Pears Paper; adhere to front flap of the card.
- Add Wink of Stella to the Tree, the berries, and the candle flame if desired.
- Stamp the sentiment onto the 1-5/8" x 2-3/8" piece of Basic White cardstock; use scissors to "banner notch" the right side of the cardstock. If using another sentiment, size your Basic White cardstock accordingly.
- To finish, adhere the left side only of the sentiment banner to the front flap of the card, being careful to not extend the glue line past where the banner sits on the front flap (so you don't glue your card shut.)
Notes
Worker Bee (for Confident Cardmakers)
Worker Bee projects are designed for the crafter who has a bit more time and enjoys creating a handmade card that features a technique or tool. In many cases, a Stampin’ Cut & Emboss Machine is required for die-cutting and/or embossing.
Worker Bee projects are designed for the crafter who has a bit more time and enjoys creating a handmade card that features a technique or tool. In many cases, a Stampin’ Cut & Emboss Machine is required for die-cutting and/or embossing.
Tried this card?Let us know how it turned out!