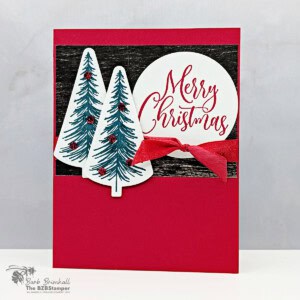
Handmade Ornamental Christmas Card
Cardstock Measurements
- Real Red Cardstock: 5-1/2" x 8-1/2" Scored at 4-1/4
- Basic White Cardstock: 4" x 5-1/4" (2 pieces; one for die-cutting)
- Country Woods Designer Paper: 3" x 4-1/8"
Step-By-Step Instructions
- Fold the Real Red cardstock in half at the score line to create the card base.
- Adhere one of the 4" x 5-1/4" pieces of Basic White Cardstock to the inside of the card.
- Using the other piece of Basic White Cardstock, stamp 2 of the trees using Pretty Peacock ink, and the sentiment using Real Red ink. (Make sure to leave room for die-cutting)
- Run the cardstock through the Stampin' Cut & Emboss Machine and die-cut the trees using the Ornamental Christmas coordinating die. Cut the sentiment using the large circle die from the Ornamental Christmas dies.
- Adhere the sentiment circle to the right side of the Country Woods Designer Paper. Wrap the Real Red ribbon around the bottom of the Country Woods Designer Paper and tie into a knot just below the sentiment. Adhere to the top of the front of the card base, about 1/2" down from the top of the card.
- Adhere the two die-cut trees to the front of the card using Stampin' Dimensionals, as shown in the sample.
- To finish, add Real Red Traditional Sparkling Sequins onto the trees as desired.
Skill Level
Worker Bee (for Confident Cardmakers)
Worker Bee projects are designed for the crafter who has a bit more time and enjoys creating a handmade card that features a technique or tool. In many cases, a Stampin’ Cut & Emboss Machine is required for die-cutting and/or embossing.
Worker Bee projects are designed for the crafter who has a bit more time and enjoys creating a handmade card that features a technique or tool. In many cases, a Stampin’ Cut & Emboss Machine is required for die-cutting and/or embossing.