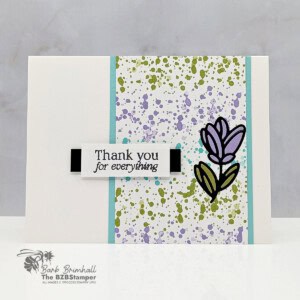
Fun Floral Thank You Card That Anyone Can Make
Make a soft, playful handmade thank you card using easy layers and a soothing color combo. A simple design you can recreate in minutes.
Supplies Needed
- Basic White Cardstock: 5-1/2" x 8-1/2" scored at 4-1/4"
- Summer Splash Cardstock: 3-1/4" x 4-1/4"
- Basic White Cardstock: 3" x 4-1/4"
- Basic White Cardstock: 3/4" x 2"
- Basic Black Cardstock: 1/2" x 2-1/2"
- Basic Black Cardstock: 1-1/2" x 2-1/2" (for die-cutting)
- Highland Heather Cardstock: 1-1/2" x 2-1/2" (for die-cutting)
- Old Olive Cardstock: 1-1/2" x 2-1/2" (for die-cutting)
Instructions
- Fold the Basic White cardstock in half at the score line to create your card base.
- Using the 3" x 4-1/4" Basic White Cardstock, stamp a row of splaters across the top in Old Olive ink. Clean your stamp and stamp a row of Highland Heather ink. Clean stamp and stamp using Summer Splash ink. Repeat 2 more times with Old Olive, then Highland Heather inks.
- Adhere the stamped Basic White cardstock to the Summer Splash cardstock and adhere to the front of the card, about 1/2" over from the right side.
- Run the scraps of Basic Black, Highland Heather, and Old Olive cardstocks through the Cut & Emboss Machine and die-cut each piece using the floral Swirled Designs dies. Adhere together so your flower looks like the sample.
- Stamp the sentiment onto the 3/4" x 2" Basic White cardstock using Black Memento ink. Glue the 1/2" x 2-1/2" piece of Basic Black cardstock to the back of the sentiment label, centering it. Adhere to the front of the card, as shown in the sample, using Stampin' Dimensionals.
Notes
Worker Bee (for Confident Cardmakers)
Worker Bee projects are designed for the crafter who has a bit more time and enjoys creating a handmade card that features a technique or tool. In many cases, a Stampin’ Cut & Emboss Machine is required for die-cutting and/or embossing.
Worker Bee projects are designed for the crafter who has a bit more time and enjoys creating a handmade card that features a technique or tool. In many cases, a Stampin’ Cut & Emboss Machine is required for die-cutting and/or embossing.
Tried this card?Let us know how it turned out!