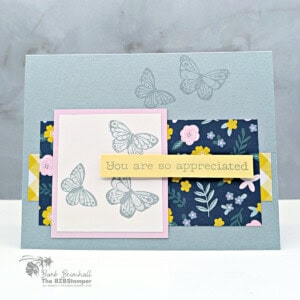
Easy Butterfly Card with the All Aflutter Stamp Set
Create a soft and simple beginner butterfly card using the All Aflutter Stamp Set and Everyday Essentials Designer Series Paper. This clean and easy all-occasion card combines pretty patterned paper, gentle color, and simple layering for a polished handmade design.
Supplies Needed
- Cloud Cover Cardstock: 5-1/2" x 8-1/2" (scored at 4-1/4")
- Basic White Cardstock: 4" x 5-1/4" (inside card)
- Everyday Essentials Designer Paper: 2-1/4" x 4-3/4" (floral pattern)
- Everyday Essentials Designer Paper: 1" x 5-1/4" (striped pattern)
- Bubble Bath Cardstock: 2-1/2" x 2-3/4"
- Basic White Cardstock: 2-1/4" x 2-1/2"
- Lemon Lolly Cardstock: 1/2" x 3-1/4"
Instructions
- Note: The Cloud Cover Ink Pad is currently unavailable. To create a Cloud Cover ink pad, take one of the Uninked Stampin' Spots and use the Cloud Cover Ink Refill to slowly add ink to the pad. Once all of the ink moves down to the bottom of the ink pad, stop inking, let set for 15 minutes, test it, and continue reinking if necessary.
- Fold the Cloud Cover cardstock in half at the score line to create your card base.
- Adhere the 4" x 5-1/4" piece of Basic White cardstock inside the card, decorating as desired.
- Ink up the outline butterfly stamp using Cloud Cover ink, doing your best to only add ink to the 2 bottom butterflies. Stamp off two times on your scratch paper and then stamp onto the top of the card front as shown in the sample. (The top butterfly is not stamped onto the top of the card.)
- Adhere the 1" strip of plaid Everyday Essentials paper about 1" up from the bottom of the card. Adhere the floral Everyday Essentials paper onto the card as shown in the sample.
- Using the Cloud Cover ink spot, ink the outline butterfly stamp and stamp onto the 2-1/4" x 2-1/2" piece of Basic White cardstock. Ink up the bold butterfly stamp with the same ink, stamp off on your cardstock, and then stamp inside the previously stamped outline stamp.
- Adhere the Basic White cardstock to the Bubble Bath cardstock and adhere to the card front - you want to place it where the butterflies move from this piece to the ones stamped on Step #4.
- Stamp the sentiment onto the Lemon Lolly cardstock. This is a very light color so you may want to add a few drops of ink refill to the Ink Spot before stamping for a darker color.
- Adhere the Lemon Lolly sentiment to the front of the card using Stampin' Dimensionals to finish.
Notes
Busy Bee (for Beginner or Busy Cardmakers)
Busy Bee projects are designed for the beginner or busy papercrafter. This is a basic cardmaking project that can be achieved by someone who has never made a handmade card before. You can view more Busy Bee cards here.
Tried this card?Let us know how it turned out!