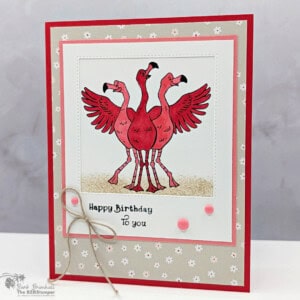
Cute Flamingo Birthday Card with the Birthday Song Stamp Set
Bring a smile to someone's birthday with this whimsical flamingo card featuring the Birthday Song Stamp Set. Layered die cuts, Stampin' Blends coloring, and versatile patterned paper combine to create a handmade birthday card that's full of personality.
Supplies Needed
- Poppy Parade Cardstock: 5-1/2" x 8-1/2" (score at 4-1/4")
- Basic White Cardstock: 4" x 5-1/4" (inside card)
- Paper Medley Paper: 4" x 5-1/4" (crumb cake with white flowers pattern)
- Flirty Flamingo Cardstock: 3-5/8" x 4-1/8"
- Basic White Cardstock: 3-1/2" x 4" (for die-cutting)
- Basic White Cardstock: 3-1/4" x 3-1/4"
Instructions
- Fold the Poppy Parade cardstock in half at the score line to create your card base.
- Adhere the 4" x 5-1/4" Basic White cardstock inside the card; decorate as desired.
- Adhere the Paper Medley Designer Paper to the front of the card.
- Run the 3-1/2" x 4" Basic White Cardstock through the Stampin' Cut & Emboss Machine using the 2-7/8" Square Die from the Stylish Shapes Dies. (Save the die-cut square for another project.)
- Stamp the sentiment in the lower left corner, as shown in the sample, using Black ink.
- Lay the die-cut Basic White cardstock onto the 3-1/4" square of Basic White cardstock, making sure it's centered. Note: I then put a strip of non-stick tape onto the frame so that it didn't move and shift. Using a pencil, please a small dot in each corner Remove the 3-1/2" 4" Basic White frame.
- Using the 4 black dots as your guide, stamp the Flamingo image onto the cardstock using Black ink. Color in with the Poppy Parade Blends. Using the Small Blending Brush and Crumb Cake ink, lightly sponge Crumb Cake ink along the bottom so it looks like they're standing in sand.
- Adhere the stamped square to the back of the die-cut Basic White cardstock so that the flamingos show through the die-cut square. Adhere to the Flirty Flamingo cardstock and then adhere to the front of the card.
- To finish, add the Array of Dots to the card as desired.
Notes
Worker Bee (for Confident Cardmakers)
Worker Bee projects are designed for the crafter who has a bit more time and enjoys creating a handmade card that features a technique or tool. In many cases, a Stampin’ Cut & Emboss Machine is required for die-cutting and/or embossing.
Tried this card?Let us know how it turned out!