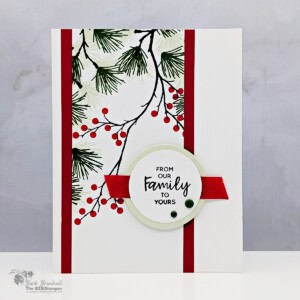
This Easy Christmas Card with the Branching Out Set features classic colors and simple Two-Step Stamping for a beautiful handmade holiday design anyone can make.
Supplies Needed
- Basic White Cardstock: 5-1/2" x 8-1/2" scored at 4-1/4"
- Real Red Cardstock: 3" x 5-1/2"
- Basic White Cardstock: 2-1/2" x 5-1/2"
- Scrap of Basic White and Soft Sea Foam cardstocks (2-1/2" x 2-1/2" for punching)
Instructions
- Fold the 5-1/2" x 8-1/2" piece of Basic White cardstock at the scoreline to create the card base.
- Using the 2-1/2" x 5-1/2" piece of Basic White cardstock, stamp the long branch onto the top of the Basic White cardstock using Tuxedo Black Memento ink pad. See sample for placement.
- Ink the berries stamp using Poppy Parade ink and stamp onto the branches as desired.
- Using Garden Green ink, stamp the pine boughs as desired. Clean the stamp and using the Soft Sea Foam ink pad, stamp next to the previously stamped images.
- Adhere the stamped Basic White cardstock to the Real Red cardstock; then adhere to the front of the card about 1/4" over from the left fold.
- Stamp the sentiment onto the scrap of Basic White cardstock; punch out using the 1-3/4" circle punch. Punch a 2" circle from the scrap of Soft Sea Foam cardstock using the 2" circle punch.
- Cut a 2" piece of the Real Red Shiny Ribbon and adhere glue just to the center of the ribbon; adhere onto the Soft Sea Foam circle. Adhere the stamped Basic White circle onto the Soft Sea Foam circle using Stampin' Dimensionals.
- Adhere the sentiment circle to the front of the card using Stampin' Dimensionals. To finish, add 2-3 of the Garden Green Dear Dots as desired.
Notes
Busy Bee (for Beginner or Busy Cardmakers)
Busy Bee projects are designed for the beginner or busy papercrafter. This is a basic cardmaking project that can be achieved by someone who has never made a handmade card before. You can view more Busy Bee cards here.
Busy Bee projects are designed for the beginner or busy papercrafter. This is a basic cardmaking project that can be achieved by someone who has never made a handmade card before. You can view more Busy Bee cards here.
Tried this card?Let us know how it turned out!