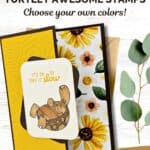
If you’re ready to create a card that’s guaranteed to make someone grin, you’re going to love this Turtle-y Cute All-Occasion card idea! Featuring the cheerful Turtle-y Awesome Stamp Set paired with the playful Turtle Textures Embossing Folder, both by Stampin’ Up!®, this sweet card is perfect for just about any occasion. Whether you’re sending encouragement, a thinking-of-you note, or just a little smile across the miles, the adorable turtle and sunny sunflower accents are sure to brighten someone’s day.

When it comes to all-occasion cards, I love designs that feel fresh, light-hearted, and easy to make — and this combo hits all the right notes. The Turtle-y Awesome Stamp Set is packed with whimsical images and sentiments, and when you add the Turtle Textures Embossing Folder into the mix, you get instant texture and personality without a lot of extra steps. (And if you’re anything like me, you know that adding a little dimension to your backgrounds makes a handmade card feel even more special!)
For this card, I kept the focus on that cute little turtle and giving him a bright pop of color with the sunflowers from the Floral Impressions Designer Paper. The sentiment “it’s ok to take it slow” fits so many moments in life — from encouragement and recovery to just a sweet reminder to pause and enjoy the little things. I love that this card can easily be adapted for a friend who needs a pick-me-up, a co-worker who’s overwhelmed, or even a student working through finals. It’s versatile, heartfelt, and oh-so-charming.
And can we talk about that Turtle Textures Embossing Folder? It’s a hidden gem! The geometric pattern is subtle but packed with personality. I used it on the background layer, running it through my Stampin’ Cut & Emboss Machine, and the result was a beautifully textured surface that instantly made the stamped turtle and flowers pop.
While this card is super simple, if you’re feeling a little fancy, you can dress it up even more. Try layering with different shades of green or yellow cardstock, adding a stitched border die-cut, or popping up your turtle with Dimensionals for extra oomph. It’s a flexible design that can be as simple or as stepped-up as you like.
At the end of the day, crafting is all about spreading joy — and nothing says joy quite like a smiling turtle in a sea of sunflowers! I hope you’re inspired to create your own version of this Turtle-y Cute card. Remember, it’s ok to take it slow — especially when it leads to a handmade card that makes someone’s whole day a little brighter.


Grab your Free copy
Get 5 Bee-utiful Exclusive
Card Sketches in Your Inbox
Join our newsletter and receive a honey of a package of five quick & simple cards guaranteed to make your creativity buzz! Sign up now and let the goodness flow straight to your inbox!

Turtle-y Awesome All-Occasion Card Recipe
Supplies Needed
- Early Espresso Cardstock: 5-1/2" x 7"scored at 2-3/4"
- Basic White Cardstock: 4" x 5-1/4"
- Floral Impressions Designer Paper: 1-3/4" x 5-1/4"
- Crushed Curry Cardstock: 2-1/2" x 5-1/4"
- Early Espresso Cardstock: 2-1/2" x 3-1/2" (for die-cutting)
- Very Vanilla Cardstock: 2-1/2" x 3-1/2" (for die-cutting)
Instructions
- Fold the Early Espresso cardstock at the score line to create your card base.
- Adhere the 4″ x 5-1/4″ piece of Basic White cardstock inside the card. Adhere the strip of Floral Impressions paper to the right side of the Basic White cardstock.
- Run the Crushed Curry cardstock through the Stampin’ Cut & Emboss Machine using the Turtle Textures Embossing Folder. Adhere to the front flap of the card.
- Run the 2-1/2″ x 3-1/2″ pieces of Very Vanilla and Early Espresso through the Cut & Emboss Machine and die-cut using the 2-3/8″ x 3″ Nested Essentials Dies.
- Stamp the turtle image onto the bottom of the Very Vanilla cardstock using Black Memento ink. Color in using the Pecan Pie Stampin’ Blends. Stamp the sentiment above the turtle image using Crushed Curry ink. Adhere the Very Vanilla die-cut to the Early Espresso die-cut at an angle as shown in the sample.
- Adhere the die-cut to the front panel of the card, applying adhesive only to the flap so you don’t accidentally glue your card shut.
Notes
I’m delighted you stopped by for today’s creative escape! Whether it’s a birthday, holiday, or any special moment, I’m here to help you craft the perfect card with ease. If you have questions about today’s tutorial, please email me for detailed steps. Inspire your craft with more ideas—join me over on Pinterest!

Don’t forget to pin this for later!

Supplies Used On This Project:


Price: $12.50