Some cards are just meant to make someone smile—and this sweet floral card using the Gallery Blooms Stamp Set by Stampin’ Up! ® does exactly that. Whether you’re sending a thank you, a birthday note, or just a little “thinking of you,” this sweet floral design checks all the boxes: it’s cheerful, simple to make, and absolutely charming.

I designed this card with versatility in mind. I wanted something that felt polished but didn’t require a million steps or supplies. That’s where the Gallery Blooms Stamp Set truly shines. The detailed line art in the stamps makes coloring effortless—you don’t need to be a watercolor expert or own a huge collection of markers to make these blooms pop. I used a soft pink and fresh green combo to match the embossed background and tie everything together.

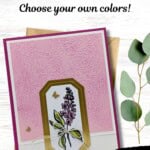
Speaking of the background—how gorgeous is that texture? It was created using the Pressed Flowers Embossing Folder. I added Petunia Pop ink with a blending brush after embossing to give it a soft, tinted look. It almost feels like spring in paper form.
The focal flower is framed using the Foiled Frames & Labels Ephemera Pack. These frames offer a timeless look to your projects and a touch of sophistication to your cards, in this case, creating pop of elegance. And that tiny twine bow? Just the right touch of whimsy.
I also added a couple of tiny gold butterflies to pull everything together. It’s one of those little details that makes a handmade card feel extra thoughtful.
This project is perfect if you’re short on time but still want to send something heartfelt. And if you’re newer to stamping, this is a great layout to try! Just change the colors, switch up the sentiment, and boom—new card, same easy layout.
So whether you’re sending a card to a friend, a neighbor, or just someone who needs a boost today, this one is guaranteed to deliver a little sunshine in an envelope.
How To Make This Card
Project Skill Level: Worker Bee
Worker Bee projects are designed for the crafter who has a bit more time and enjoys creating a handmade card that features a technique or tool. In many cases, a Stampin’ Cut & Emboss Machine is required for die-cutting and/or embossing.
Cardstock Measurements:
- Berry Burst Cardstock: 4-1/4″ x 5-1/2″
- Basic White Cardstock: 4″ x 9-1/2″, scored at 4-1/4″
- Pretty in Pink Cardstock: 3-3/4″ x 4″
- Basic White Cardstock: 1-3/4″ x 3-1/8″


Grab your Free copy
Get 5 Bee-utiful Exclusive
Card Sketches in Your Inbox
Join our newsletter and receive a honey of a package of five quick & simple cards guaranteed to make your creativity buzz! Sign up now and let the goodness flow straight to your inbox!
Step-by-Step Instructions:
- Fold the 4″ x 9-1/2″ piece of Basic White cardstock on the 4-1/4″ score line and adhere to the Berry Burst cardstock to create your card base.
- Run the Pretty in Pink cardstock through the Stampin’ Cut & Emboss Machine using the Pressed Flowers Embossing Folder. Using a Blending Brush, lightly sponge Petunia Pink ink over the embossed cardstock. Adhere to the front flap of the card front.
- Adhere the double gold frame from the Frames & Labels Ephemera Pack onto the slightly smaller 1-3/4″ x 3-1/8″ Basic White Cardstock. Carefully trim all 4 corners using scissors. Stamp the floral image onto the Basic White cardstock inside the frame using Black Memento ink.
- Color in the floral image using the Petuna Pop and Granny Apple Green Stampin’ Blends. Adhere only the top part of the frame (where it will be attached to the top flap of the card) using adhesive. Be careful to not add any adhesive below the flap or you’ll accidentally glue your card shut.
- Tie the linen thread into a bow and adhere to the floral image.
- To finish, add 2 of the Brass Butterflies to the card as desired.
A Tip from Barb
If you don’t have a Cut & Emboss Machine, you can crumple the Pretty in Pink cardstock in your hands until it’s well crinkled. Smooth it back out and lightly sponge on the ink as described in Step #2. Then continue making the card per the instructions above. It will be a different look but still very pretty!
Thanks for joining me in today’s crafting session! I’m passionate about helping you create versatile cards for any celebration, designed to be quick yet impressive. For additional guidance on today’s tutorial, feel free to email me. Stay connected! Follow my Facebook Community for more crafting tips and updates.

Don’t forget to pin this for later!