There’s just something magical about creating a handmade card during the winter season, and this Snowflake Kisses Card with the Elegant Pine Paper is the perfect example of that. The mix of shimmering foiled accents, cozy holiday colors, and a heartfelt stamped sentiment captures all the warmth of the season in one beautiful project. When you send a card like this, it’s not just paper and ink—it’s a little piece of joy wrapped up in an envelope, ready to brighten someone’s day.

Think about how you feel when you open your mailbox in December. Bills, catalogs, maybe a stray grocery flyer. And then—tucked in the stack—you spot a hand-addressed envelope. Right away, you know this one’s special. You tear it open and find a handmade card inside, carefully designed just for you. The message may be simple, but the feeling? Pure connection. That’s what stamping is all about: giving your creativity a voice while making someone else feel remembered, appreciated, and loved.
The Snowflake Kisses Bundle is perfect for that. It combines sweet, sentiment-only stamps with an assortment of intricate dies that make your cards look instantly impressive. Add in the Elegant Pine Designer Paper, and you’ve got a design that feels cozy and elegant all at once. Even if you’re new to cardmaking, this card comes together beautifully with just a few supplies and a little ribbon for texture. The result is a card that looks like it took hours—but really, you can make it in under 30 minutes.


Grab your Free copy
Get 5 Bee-utiful Exclusive
Card Sketches in Your Inbox
Join our newsletter and receive a honey of a package of five quick & simple cards guaranteed to make your creativity buzz! Sign up now and let the goodness flow straight to your inbox!
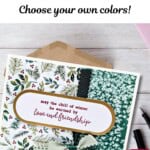
And let’s talk about color!
What I love most about this project is how versatile it is. By swapping out the colors, it can lean Christmas, winter birthday, or even a heartfelt thank-you card after the holidays. The Cherry Cobbler ink sets a traditional holiday mood, while the foiled frames from the Ephemera Pack bring in a bit of luxury without any extra effort. And the ribbon? That little bow adds just the right finishing touch, like the bow on a carefully wrapped gift.

If you’ve ever felt overwhelmed by crafting supplies, this card is proof that you don’t need a whole room of products to create something beautiful. With the coordinating stamps, paper, and embellishments, everything just works together. No guessing, no stressing—just that wonderful “I made this!” feeling when you hold the finished card in your hands. And when you send it off to a friend, neighbor, or loved one, you’re not just checking a holiday task off your list—you’re sending them a little burst of happiness.
The best part? Cards like this remind us that handmade doesn’t have to mean complicated. The Snowflake Kisses Bundle makes it simple to share a little winter warmth, whether you’re creating one card or a whole stack to mail out this season. Each time you stamp, you’re making something that will live on someone’s fridge, mantel, or memory box—a reminder that they’re thought of and cared for.
So if you’ve been waiting for a sign to pull out your stamps, papers, and ribbons, this is it. Grab your Snowflake Kisses Bundle, add in the Elegant Pine Designer Paper, and start crafting your own batch of cozy winter greetings. You’ll be amazed at how quickly your creativity flows once you see how easily these pieces come together.
Want more quick & easy card designs? Check them out here!
Don’t forget to pin this for later!

Thanks for joining me in today’s crafting session! I’m passionate about helping you create versatile cards for any celebration, designed to be quick yet impressive. For additional guidance on today’s tutorial, feel free to email me. Stay connected! Follow my Facebook Community for more crafting tips and updates.


Winter Card using the Snowflake Kisses Stamp Set
Supplies Needed
- Basic White Cardstock: 4-1/4" x 11" scored at 5-1/2"
- Basic White Cardstock: 4" x 5-1/4" (optional but definitely easier!)
- Elegant Pine Designer Paper: 3-1/4" x 4" (Pattern #1)
- Elegant Pine Designer Paper: 2" x 4" (Pattern #2)
Instructions
- Fold the 4-1/4" x 11" piece of Basic White Cardstock in half at the 5-1/2" score line to create you card base.
- Adhere the Elegant Pine Paper (Pattern 1) to the left side of the 4" x 5-1/4" piece of Basic White Cardstock. Adhere the Elegant Pine Paper (Pattern 2) to the right side of the Basic White cardstock. (Alternatively, adhere the 2 pieces of Elegant Pine Paper together so that they measure 4" x 5-1/4"; I find it easier to use the Basic White cardstock.)
- Wrap the Ribbon around the Elegant Pine Paper and tie into a bow at the bottom of the paper.
- Using one of the long Foiled Frames from the Ephemera Pack, stamp the sentiment using Cherry Cobbler ink. Adhere to the card, as shown in the sample, using Stampin' Dimensionals to finish.
Notes
Busy Bee projects are designed for the beginner or busy papercrafter. This is a basic cardmaking project that can be achieved by someone who has never made a handmade card before. You can view more Busy Bee cards here.
Supplies Used On This Project:


Price: $12.50