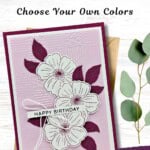
This sneak peek of the Lovely Arrangements Bundle might be one of the prettiest floral sets coming our way, and this card shows off how soft and elegant it can look with a simple monochromatic palette. I love the calm feel of these pink tones paired with the clean white blooms—it’s the kind of project that feels peaceful to make and even sweeter to give.
And once you run the All in a Row Embossing Folder through your Stampin’ Cut & Emboss Machine, the whole card gets this beautiful texture that makes it look polished without adding extra work. It’s a lovely mix of simple stamping and easy die-cutting, and it comes together in a way that feels effortless.

This color palette feels so soothing. The Berry Burst adds gentle depth, the Bubble Bath keeps everything light and airy, and the Basic White softens the whole look with clean contrast. It’s the kind of color combo that instantly feels warm, feminine, and welcoming.
What makes this mix so lovely is how easy it is to build a card that feels balanced without overthinking anything. The rich floral layers sit beautifully against the soft embossed background, and the crisp sentiment pulls everything together. It’s a wonderful choice when you want something elegant without using a bunch of supplies or techniques.

Lovely Arrangements Floral Birthday Card
Supplies Needed
- Berry Burst Cardstock: 5-1/2" x 8-1/2" scored at 4-1/4"
- Basic White Cardstock: 4" x 5-1/4" (2 pieces)
- Bubble Bath Cardstock: 3-3/4" x 5"
- Berry Burst Cardstock: 2-1/2" x 6" (for die-cutting)
- Basic White Cardstock: 3" x 6" (for die-cutting)
Instructions
- Fold the Berry Burst cardstock in half at the 4-1/4" score line to create your card base. Adhere one of the 4" x 5-1/4" pieces of Basic White cardstock inside the card.
- Run the Bubble Bath cardstock through the Stampin' Cut & Emboss Machine using the All In A Row Embossing Folder. Adhere to the other 4" x 5-1/4" piece of Basic White cardstock and adhere to the front of the card.
- Using the 3" x 6" piece of Basic White cardstock, stamp the "happy birthday" sentiment onto the cardstock using Black Memento ink. Stamp 3 of the flowers onto the cardstock using Berry Burst ink.
- Run the 3" x 6" piece of Basic White cardstock through the Cut & Emboss Machine and die-cut the 4 images using the appropriate Lovely Arrangements Dies from the Bundle. Set aside.
- Run the 2-1/2" x 6" piece of Berry Burst cardstock through the Stampin' Cut & Emboss Machine and die-cut 4 sets of the double-leaves die, for a total of 8 leaves. Tear 1 of the double leaves in half so that you have 2 leaves; adhere one of the 2 leaves onto one of the double leaves so you have 1 trio of leaves.
- Adhere the leaves/flowers to the front of the card as shown in the sample.
- Tie a large bow using the Basic White Baker's Twine from the Baker's Twine Essentials Pack and adhere to the back of the sentiment banner. Adhere the banner to the front of the card using Stampin' Dimensionals to finish.
Notes
Worker Bee projects are designed for the crafter who has a bit more time and enjoys creating a handmade card that features a technique or tool. In many cases, a Stampin’ Cut & Emboss Machine is required for die-cutting and/or embossing.
The simplicity of this card really makes the Lovely Arrangements Bundle shine here. The simple line-art flowers are easy to stamp, easy to die-cut, and easy to cluster together for a soft focal point. The dies give you clean edges and pretty leaves without needing any coloring at all. It’s a “sit down and relax” kind of project, and those are always my favorite.
Once you emboss that background panel, everything comes alive. The texture adds interest without taking attention from the florals, and the crisp birthday greeting finishes it off. It’s sweet, classy, and works for almost anyone who loves a soft floral look.
If you love cards that feel elegant but still come together quickly, this one is such a joy to make. The monochromatic colors, the embossed background, and the simple floral layering give you a birthday card that looks special without needing complicated steps. It’s the perfect project for a quiet afternoon of crafting.
Love this color combo? Pin it for later!

I’m delighted you stopped by for today’s creative escape! Whether it’s a birthday, holiday, or any special moment, I’m here to help you craft the perfect card with ease. If you have questions about today’s tutorial, please email me for detailed steps. Inspire your craft with more ideas—join me over on Pinterest!

Supplies Used On This Project:


Grab your Free copy
Get 5 Bee-utiful Exclusive
Card Sketches in Your Inbox
Join our newsletter and receive a honey of a package of five quick & simple cards guaranteed to make your creativity buzz! Sign up now and let the goodness flow straight to your inbox!