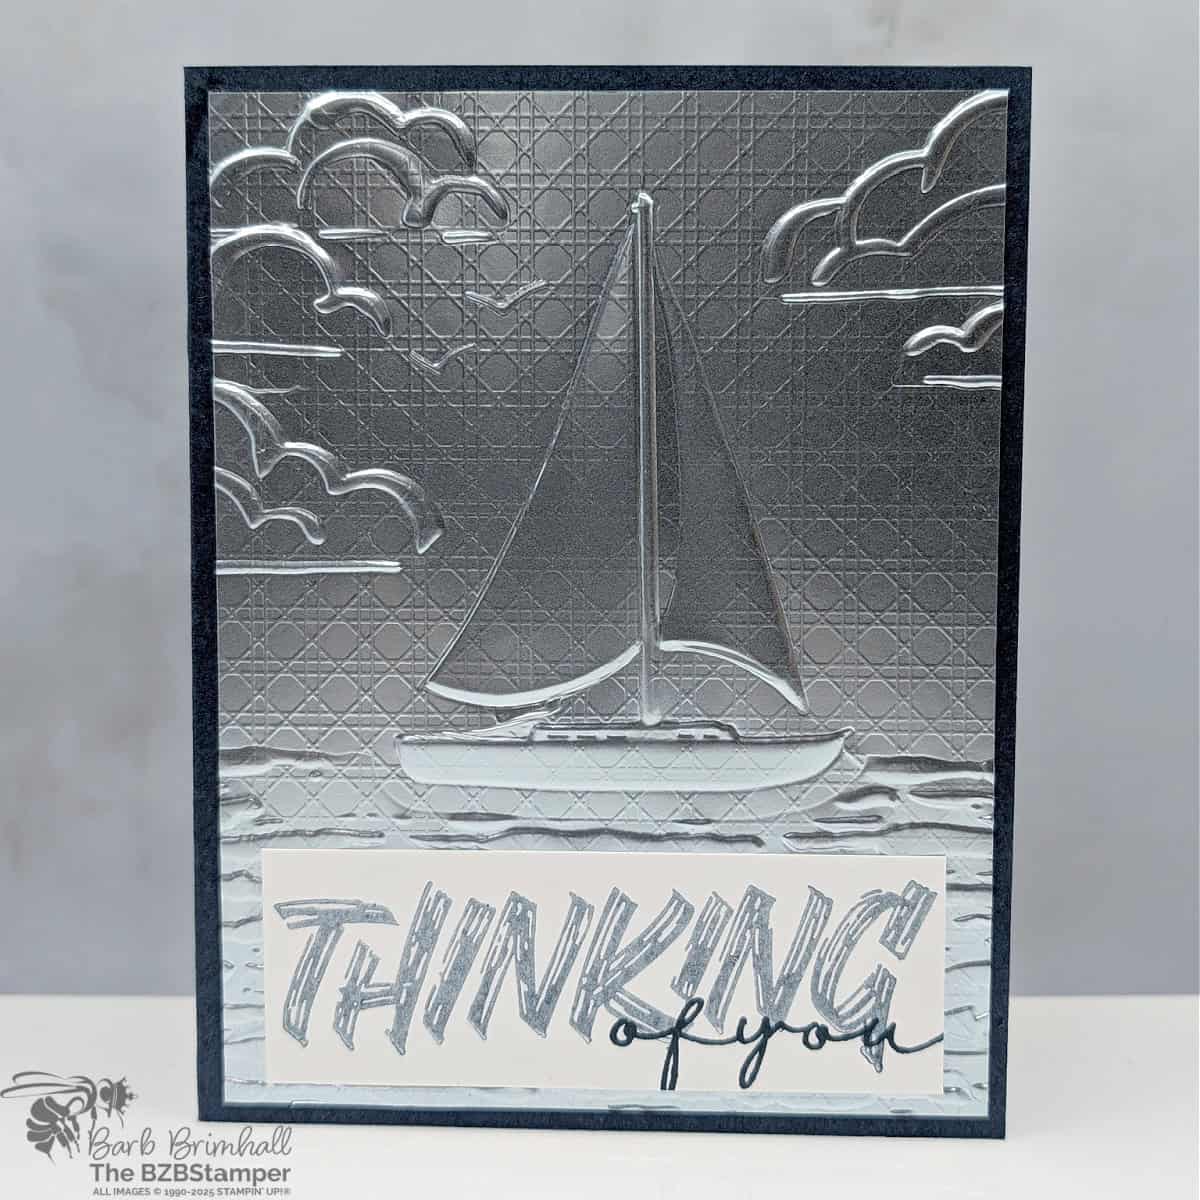
Brighten someone’s day with a Layered Thoughts Thinking of You Card and the Sunrise Sailing Embossing Folder by Stampin’ Up!® When you want to let a friend or loved one know you’re thinking about them, a handmade card can say it all — especially when it’s crafted with coastal elegance and a little extra shimmer.

For this design, I wanted to bring a touch of sophistication to the classic sailboat scene. Enter silver foil! Using silver foil accents gave the card just the right amount of sparkle — like the sunlight glinting off the ocean waves. Paired with the textured layers from the Sunrise Sailing Hybrid Embossing Folder, the final look is breathtaking but still wonderfully easy to create.
I started with a palette of cool blues and soft grays to set a calming mood, then added silver foil for the sailboat and subtle wave accents. The Hybrid Embossing Folder made it simple to add gorgeous dimension to the background, creating ripples that feel like they’re gently moving across the page. The combination of texture and shine really makes this card feel extra special without requiring a lot of complicated techniques.
When it came time to choose a sentiment, I reached for the Layered Thoughts Stamp Set — it has the perfect “Thinking of You” greeting in a soft, friendly font that blends beautifully with the ocean theme. I love mixing and matching bundles and stamp sets like this because it lets me get even more mileage out of my crafting supplies. And in this case, the gentle feel of the Layered Thoughts sentiment was the ideal finishing touch.
One of my favorite parts about using silver foil on a card like this is how it instantly makes the design look polished and professional. It catches the light in a way that paper alone can’t, and it adds that little extra something that turns a simple handmade card into a keepsake. If you’ve never worked with foil before, don’t worry — it’s easy to cut with your dies and adds zero fuss to your process!
The Sunrise Sailing Embossing Folder is such a wonderful tool for crafting heartfelt cards for any occasion. Whether you’re sending a Thinking of You, a Happy Birthday, or even a simple Hello, the sailboat imagery evokes feelings of peace, hope, and new horizons. It’s one of those bundles you’ll reach for again and again, especially when you want your cards to feel like a breath of fresh air.
So if you’re looking for a way to brighten someone’s day, why not sail into creativity with the Sunrise Sailing Bundle partnered with the Layered Thoughts Stamp Set? A handmade Thinking of You card with a shimmer of silver could be just the little lift they need — and you’ll love how simple and satisfying it is to create something so beautiful.
How To Make This Card
Project Skill Level: Worker Bee
Worker Bee projects are designed for the crafter who has a bit more time and enjoys creating a handmade card that features a technique or tool. In many cases, a Stampin’ Cut & Emboss Machine is required for die-cutting and/or embossing.
Cardstock Measurements:
- Secret Sea Cardstock: 5-1/2″ x 8-1/2″, scored at 4-1/4″
- Basic White Cardstock: 4″ x 5-1/4″
- Flower Garden Foils Specialty Paper: 4″ x 5-1/4″
- Basic White Cardstock: 1-1/4″ x 3-1/2″


Grab your Free copy
Get 5 Bee-utiful Exclusive
Card Sketches in Your Inbox
Join our newsletter and receive a honey of a package of five quick & simple cards guaranteed to make your creativity buzz! Sign up now and let the goodness flow straight to your inbox!
Step-by-Step Instructions:
- Fold the Secret Sea Cardstock in half at the score line to create your card base.
- Adhere the 4″ x 5-1/4″ piece of Basic White cardstock inside the card.
- Run the Silver Flower Garden Foil paper through the Cut & Emboss Machine using the Sunrise Sailing Hybrid Embossing Folder. Adhere to the front of the card.
- Ink up the “thinking” stamp using Secret Sea ink and stamp off 3 times on your scratch paper. Stamp into the 1-1/4″ x 3-1/2″ piece of Basic White cardstock. Stamp the “of you” onto the “thinking” using Secret Sea ink.
- Adhere the sentiment to the bottom of the card to finish.
Thanks for stopping by for today’s card tutorial! My goal is to help you make quick & easy greeting cards for all occasions. If you’d like more detailed directions on how to make this card, feel free to email me. I hope you’ll join me again for more card-making ideas!

Don’t forget to pin this for later!


