This adorable Feel Better Card using the Hugs and Healing Stamp Set by Stampin’ Up!® is the perfect project for when you want to send a thoughtful message—without needing a ton of supplies or time. If you’re new to stamping or simply in the mood for something quick and heartwarming, this beginner-friendly card offers just the right mix of ease and emotion.

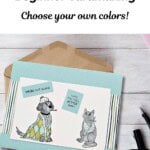
This sweet design features two of the most lovable characters in the set: a dog bundled in a blanket with a thermometer and an ice pack, and a cat with a bandaged paw and a slightly grumpy expression (because, let’s be honest, cats are not fans of vet visits). These images are a lighthearted way to show someone you’re thinking of them and wishing them a speedy recovery.
The card starts with a Pool Party card base, and soft calming colors that sets a gentle tone. I added a vertical strip of the Turtle-y Cute Designer Series Paper—a playful pattern that ties everything together without overwhelming the card. The main panel is clean and simple, giving the stamped images plenty of space to shine.
Both animals were colored using Stampin’ Blends, which are fantastic for beginners and experienced crafters alike. They make shading a breeze, and the smooth color application adds depth without any fuss. If you’re just starting out with Blends, don’t worry—this is a great image to practice on since the lines are simple and the details are easy to follow.
To finish, I added two stamped sentiments from the set: “You’re Not Alone” and “Hope You Feel Better Soon.” I cut them into rectangles and tilted them slightly, almost like Post-it notes on a fridge. That little detail gives the card personality while keeping it simple enough to recreate in multiples.
What I love most about this card is that it proves you don’t need an advanced layout or complicated tools to create something meaningful. With just stamps, paper, and a few markers, you can make someone’s day a little brighter.
Whether you’re crafting for a sick friend, cheering up a neighbor, or just building your stash of encouragement cards, the Hugs and Healing Stamp Set is a go-to for heartfelt projects. It’s a fun, friendly set that delivers comfort in every image—and this project is a great place to start.
How To Make This Card
Project Skill Level: Busy Bee
Busy Bee projects are designed for the beginner or busy papercrafter. This is a basic cardmaking project that can be achieved by someone who has never made a handmade card before. You can view more Busy Bee cards here.
Cardstock Measurements:
- Pool Party Cardstock: 5-1/2″ x 8-1/2″, scored at 4-1/4″
- Basic White Cardstock: 4″ x 5-1/4″
- Turtle-y Cute Designer Series Paper: 2-1/2″ x 5-1/2″
- Basic White Cardstock: 3″ x 4-1/2″
- Pool Party Cardstock: 1/2″ x 1-1/2″ (you’re not along sentiment)
- Pool Party Cardstock: 3/4″ x 1″ (hope you feel better soon sentiment)


Grab your Free copy
Get 5 Bee-utiful Exclusive
Card Sketches in Your Inbox
Join our newsletter and receive a honey of a package of five quick & simple cards guaranteed to make your creativity buzz! Sign up now and let the goodness flow straight to your inbox!
Step-by-Step Instructions:
- Fold the Pool Party cardstock in half to create your card base.
- Adhere the 4″ x 5-1/4″ piece of Basic White cardstock inside the card.
- Adhere the Turtle-y Cute Designer Series Paper to the front of the card.
- Using the 3″ x 4-1/2″ piece of Basic White cardstock, stamp the Dog and the Cat onto the cardstock (see sample for placement) using Black Memento ink. Color in the images using the Stampin’ Blends. Tip: I used only the Old Olive Light Blend for the Blanket and the Bubble Bath Light Blend for the cat’s nose & ears. I used the Basic Black Marker for the Dog’s nose.
- Adhere the Basic White Cardstock to the front of the card, centering on the Designer Paper.
- Stamp the sentiments onto the Pool Party cardstock using Black Memento ink; adhere to the card as desired, or as shown in the sample, to finish.
A Tip from Barb
I prefer to use Stampin’ Blends (Stampin’ Up!’s version of alcohol markers) but if you don’t have any, watercolor pencils or Blender Pens with ink pads would work wonderfully too!
I appreciate you dropping by! My mission is to inspire you with card tutorials that are as fun to make as they are to give. If you’re curious about the specifics of crafting today’s design, just send me an email. Want more papercrafting ideas? Join my Facebook Community today.

Don’t forget to pin this for later!