If you’re looking for a simple way to carve out a little creative time during a busy week, this project from Coffee and a Card using Layered Thoughts Stamp Set is a perfect starting point. It’s cheerful, beginner-friendly, and all about sending a little handmade sunshine to someone’s mailbox. And the best part? You can make it in under 30 minutes with just a few key supplies!

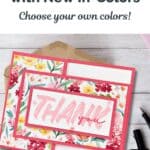
This is the exact card we made during this week’s Coffee & a Card—our casual midweek craft break on Facebook where we chat, sip on our favorite beverage, and make something wonderful. And this card? It checks all the boxes: a bright and bold “thank you” sentiment from the Layered Thoughts Stamp Set, happy floral paper from the Florals in Bloom Designer Series Paper, and those gorgeous new 2025–2027 In Colors—Pretty in Pink and Strawberry Slush. These two ink colors work beautifully together and give this card a vibrant-yet-soft look that feels like summer in an envelope.

The layout is simple, yet it feels a little extra special thanks to the layered panel design. The sentiment really stands out thanks to the oversized brushstroke font (seriously, how good is that bold “THANK” layered with a delicate “you”?). And a few sparkly embellishments add the final touch without adding bulk—so it’s easy to mail, too!
If you like this card, make sure you watch a recap of the live video, as well as the written Tutorial, which has all of the measurements and step-by-step instructions.
June 11, 2025 Facebook Live (Edited)
You can find more video tutorials on our Youtube Channel
Project Skill Level: Busy Bee
Busy Bee projects are designed for the beginner or busy papercrafter. This is a basic cardmaking project that can be achieved by someone who has never made a handmade card before. You can view more Busy Bee cards here.
GRAB THE TUTORIAL
Want the tutorial for this card? Just click on the button below for card measurements and step-by-step instructions.


Grab your Free copy
Get 5 Bee-utiful Exclusive
Card Sketches in Your Inbox
Join our newsletter and receive a honey of a package of five quick & simple cards guaranteed to make your creativity buzz! Sign up now and let the goodness flow straight to your inbox!
A Tip from Barb
If you want to use any of the other sentiments, just measure the stamp, add 1/4″ on each side for your neutral (in this case Basic White) cardstock. Then for the coordinating color cardstock mat, add another 1/4″ and you’ll have the perfect mat!
I appreciate you dropping by! My mission is to inspire you with card tutorials that are as fun to make as they are to give. If you’re curious about the specifics of crafting today’s design, just send me an email. Want more papercrafting ideas? Join my Facebook Community today.

Don’t forget to pin this for later!