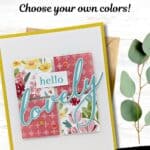
Create this cheery card idea using the Sweet Blooms Bundle by Stampin’ Up!® There’s just something about a cheerful card that makes you feel lighter—even before you put it in the mailbox. With its sunny colors, floral paper scraps, and a die-cut sentiment that feels like a smile, this is a quick project to make but it’s full of heart.

What I love about this design is that it uses scraps in a way that doesn’t feel like a scrap card. Four little squares of the Florals in Bloom Designer Series Paper become a mini quilt of color and pattern—each one a tiny piece of art. And even though they’re all different, they come together beautifully, especially when paired with a bold sentiment.
Enter the Sweet Blooms Bundle. That large “lovely” die cut really steals the show here. I cut it in Summer Splash to add some cool contrast to the warm Darling Duckling card base. (Isn’t that the happiest yellow?)

And of course, I couldn’t resist adding just a few of the In-Color Flat Pearls. They’re like little bubbles of joy—subtle but sparkly, and they help bring attention to the different squares without overwhelming the design. They’re one of those embellishments you’ll reach for over and over again.
The Sweet Blooms Bundle is one of those sets you’ll keep reaching for. The sentiments are warm and kind. The dies are bold but easy to use. And the style plays well with almost any paper you pair it with. Whether you go soft and romantic or bold and playful, it works.
So if your crafting mojo needs a little spark, give this cheerful card a go. It’s quick, fun, and full of possibilities—and the best part? You’ll walk away with a finished card that’s ready to brighten someone else’s day.
How To Make This Card
Project Skill Level: Worker Bee
Worker Bee projects are designed for the crafter who has a bit more time and enjoys creating a handmade card that features a technique or tool. In many cases, a Stampin’ Cut & Emboss Machine is required for die-cutting and/or embossing.
Cardstock Measurements:
- Darling Duckling Cardstock: 5-1/2″ x 8-1/2″, scored at 4-1/4″
- Basic White Cardstock: 4″ x 5-1/2″ (2 pieces)
- Florals In Bloom Designer Paper: 4 squares of your choice, 1-1/2″ x 1-1/2″
- Basic White Cardstock: 1/2″ x 1-1/4″
- Basic White Cardstock: 4″ x 4″ (for die-cutting)


Grab your Free copy
Get 5 Bee-utiful Exclusive
Card Sketches in Your Inbox
Join our newsletter and receive a honey of a package of five quick & simple cards guaranteed to make your creativity buzz! Sign up now and let the goodness flow straight to your inbox!
Step-by-Step Instructions:
- Fold the Darling Duckling cardstock in half at the score line to create your card base.
- Adhere one of the 4″ x 5-1/4″ pieces of Basic White cardstock inside the card. Adhere th other piece to the front of the card.
- Adhere the four 1-1/2″ squares of Florals in Bloom paper to the center of the card as shown in the sample, using Stampin’ Dimensionals.
- Stamp the “hello’ onto the 1/2″ x 1-1/4” piece of Basic White cardstock using Summer Splash ink. Adhere to the center of the top 2 squares using adhesive.
- Stamp the “lovely” onto the 4″ scrap of Basic White cardstock using Summer Splash ink. Run through the Stampin’ Cut & Emboss Machine and die-cut using the coordinating Sweet Blooms die. Adhere to the front of the card as shown in the sample using adhesive.
- To finish, add 3 of the 2025-2027 In-Color Flat Pearls as desired.
A Tip from Barb
This layout makes a great card set. Try mixing and matching papers from the same pack to create a full set of “lovely” cards you can gift or keep on hand. It’s one of those layouts that feels different every time depending on the papers and colors you use.
Thanks for stopping by for today’s card tutorial!
My goal is to help you make quick & easy greeting cards for all occasions. If you’d like more detailed directions on how to make this card, feel free to email me. I hope you’ll join me again for more card-making ideas!

Don’t forget to pin this for later!

Supplies Used On This Project:


Price: $12.50