Try this elegant All Occasion Card using the Gallery Blooms Bundle by Stampin’ Up!® and see how combining a few coordinating supplies can create something truly special. This card was designed for those times when you want your handmade card to feel a little extra—but without being complicated or fussy.

It’s not a beginner card. It uses quite a few different products, including the Gallery Blooms Bundle, the Floral Impressions Designer Series Paper, the Simply Said Stamp Set, plus the 2″ Circle Punch. But even with all those elements, it’s surprisingly easy to put together. This is the kind of project that gives you that satisfying “wow” factor without spending hours crafting.
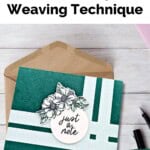
The background features a paper weaving technique using strips of the soft blue patterned paper from the Floral Impressions pack. It adds visual texture and interest without needing ink or embossing folders. It’s also a great way to use up scraps.
The florals from the Gallery Blooms Bundle were stamped, colored with soft greens and blue tones, then die cut and layered above the sentiment. That clean circle sentiment was punched using the 2″ Circle Punch and stamped with one of my favorite greetings from the Simply Said Stamp Set. It’s perfect for so many different occasions!
What I love about this card is that it’s versatile. The layout works beautifully for any sentiment, and the rich colors make it feel appropriate for everything from a birthday to a thinking-of-you note. You can also adjust the color scheme depending on the occasion or season. (Check out my Color Combination Library for inspiration.)

If you’re an intermediate stamper looking for a card that looks polished but still feels achievable, this is a great one to try. You can prep the elements in advance and then assemble in batches, making it ideal for craft nights or creating your own stash of go-to cards.
Cards like this are a great reminder that using what you have—when it’s coordinated well—can lead to truly beautiful results. And when you send it? You’ll know it’s a card that feels just as good to give as it does to make.
How To Make This Card
Project Skill Level: Worker Bee
Worker Bee projects are designed for the crafter who has a bit more time and enjoys creating a handmade card that features a technique or tool. In many cases, a Stampin’ Cut & Emboss Machine is required for die-cutting and/or embossing.
Cardstock Measurements:
- Shaded Spruce Cardstock: 5-1/2″ x 8-1/2″, scored at 4-1/4″
- Basic White Cardstock: 4″ x 5-1/4″ (2 pieces)
- Floral Impressions Designer Series Paper: 5/8″ x 4-1/4″ (2 pieces)
- Floral Impressions Designer Series Paper: 5/8″ x 5-1/2″ (2 pieces)


Grab your Free copy
Get 5 Bee-utiful Exclusive
Card Sketches in Your Inbox
Join our newsletter and receive a honey of a package of five quick & simple cards guaranteed to make your creativity buzz! Sign up now and let the goodness flow straight to your inbox!
Step-by-Step Instructions:
- Fold the Shaded Spruce cardstock in half at the score line to create your card base.
- Adhere one of the 4″ x 5-1/4″ pieces of Basic White cardstock inside the card.
- Adhere 1 of the 5/8″ x 4-1/4″ pieces of Floral Impressions paper to the right side of the card, about 2″ over from the right. Adhere 1 of the 5/8″ x 5-1/2″ pieces of Floral Impressions paper to the middle part of the card front, about 2″ up from the bottom of the card front.
- Adhere the second piece of 5/8″ x 4-1/4″ Floral Impressions paper 1/4″ to the right of the first piece of 5/8″ x 4-1/4″ paper. Adhere the second piece of 5/8″ x 5-1/2″ Floral Impressions paper 1/4″ below the first piece. This will create a faux “paper weaving” effect.
- Using the other piece of 4″ x 5-1/4″ Basic White cardstock, stamp the sentiment on one side of the cardstock using Black Memento ink. Punch out using the 2″ circle punch. On the remaining cardstock, stamp the double flower image using Black Memento ink. Color in the image using the Pool Party Blends for the flowers and the Shaded Spruce Blends for the leaves.
- Run the cardstock through the Stampin’ Cut & Emboss Machine and die-cut the image using the Gallery Blooms Dies from the Bundle.
- Adhere just the bottom of the die-cut image to the top of the 2″ circle, then adhere the entire image to the front of the card using Stampin’ Dimensionals to finish.
A Tip from Barb
This is the perfect card sketch for whenever you have some pretty paper you’d like to use! Just grab colors from the paper you want to use and pull your coordinating cardstock, inks and any embellishments you’d like! An easy peasy card without any stress – I love when my pretty paper can do the heavy lifting on my cards!?
Thanks for stopping by for today’s card tutorial! My goal is to help you make quick & easy greeting cards for all occasions. If you’d like more detailed directions on how to make this card, feel free to email me. I hope you’ll join me again for more card-making ideas!

Don’t forget to pin this for later!

Supplies Used On This Project:


Price: $12.50